Assay designs are LabKey Server's way of capturing and importing instrument data from a wide variety of file output formats. The data structures of an assay design tell the server how to interpret the instrument output, so that the data can be uploaded 'into' the design and stored with metadata for further use.
Create an Assay Design
When you create an
assay design, you start from an assay type (usually "Standard"), give it a unique name, and then customize the defaults to fit your specific requirements.
- Click New Assay Design in the Assay List web part (or via (Admin) > Manage Assays).
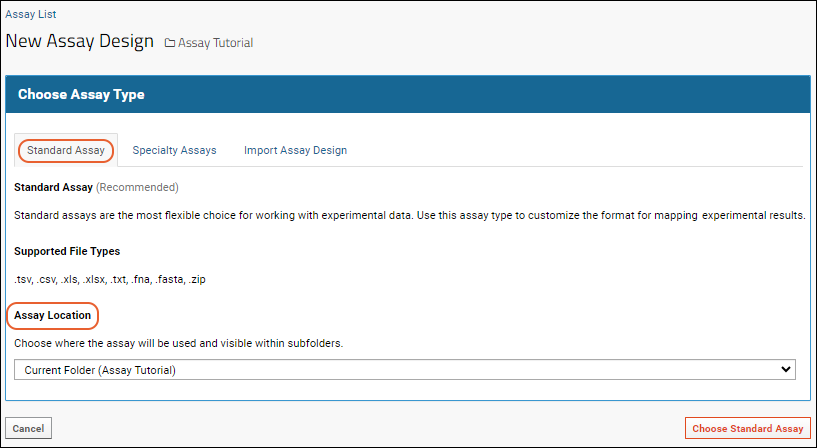
- By default, you will be on the Standard Assay tab.
- If you are using a Premium Edition and want to create an instrument-specific design, click the Specialty Assays tab and select the desired format. For more details, see below
- Select the Assay Location: This determines where the assay design is available. You can scope your design to the current folder, the current project, or place it in the Shared project to make it available site wide.
- Click Choose Standard Assay.

Define Assay Properties
Assay properties are set once for all uses of the design. For example, whether runs/results are editable and whether to enable setting of QC states.
Review details about these properties in this topic:
Assay Design Properties
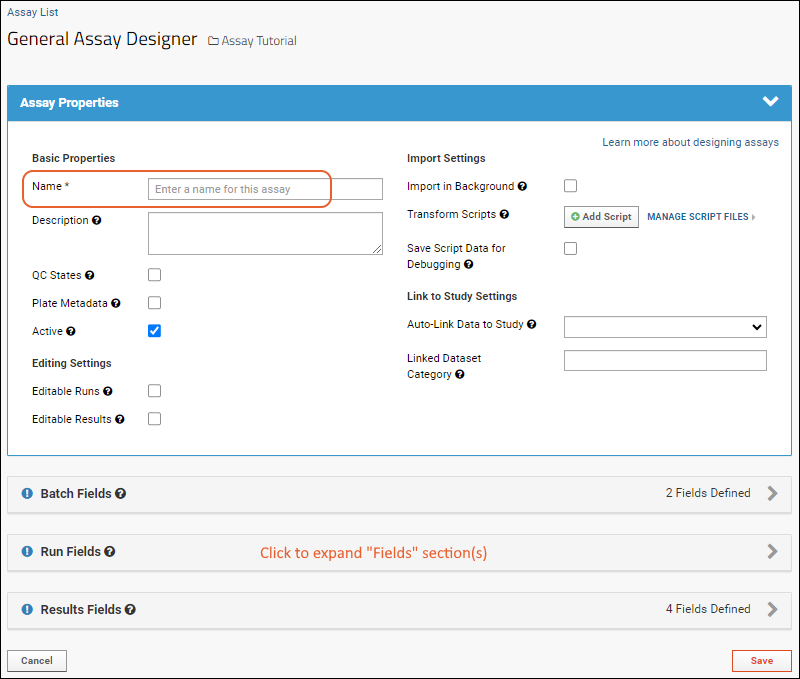
- Enter Assay Properties:
- Enter a unique Name: the name is always required and while it may be changed after the design is created, it must remain unique.

Note that users with the
Platform Developer role will see additional assay properties for working with
transform scripts, not shown above.
Assay Fields
Each assay design consists of sets of fields, each capturing the contents of some individual column of uploaded assay data or metadata about it. Results/data fields can each have properties such as:
- The data type
- Whether a value is required
- How to validate values and/or how to interpret special values
- How to display the resulting data and use it in reporting
Some fields will be populated from the uploaded data itself, other values can be provided by the operator at import time.
Fields are grouped into (at least) three categories:
- Batch: A setting applies to an entire batch of runs (or files) uploaded at once. Example: the email of the person uploading the data.
- Run: A setting applies to all the data in a single run, but may vary between them. Example: An instrument setting at the time of the run.
- Results/Data: A setting applies only to a single row. Example: the ID of the participant each row of data is about.
- Additional Categories: Some assay designs will include sections for plate data, analyte information, or other details.
Any fields already part of the assay type you selected are prepopulated in
batch, run, and results field sections.
- Click each Fields section to open it.
- You can see the number of fields defined in the header bar for each section.
- Review the predefined fields, add any new ones, and make any changes needed.
- Before any fields have been added to a given section, you have the option to import field definitions from a prepared JSON file. Otherwise, click Manually Define Fields.
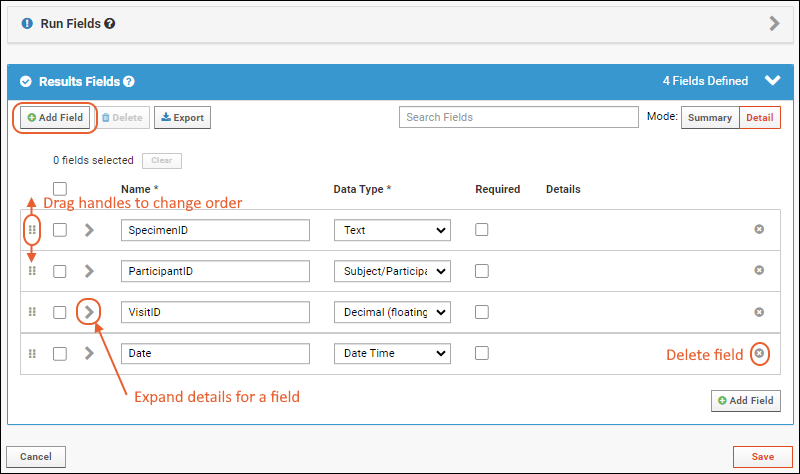
- Click Add Field to add a new field.
- Drag and drop to rearrange fields using the handles on the left.
- If you need to remove a field, click the .
- Open the settings and properties panel for fields using the (expansion) icon.
- Learn more about editing properties of fields in this topic: Field Editor

- Click Save when finished. Your new assay is now listed in the Assay List web part.
Once defined, you can import as many data files as you wish using this design.
To edit, copy, delete or export an assay design, please see:
Manage an Assay Design.
Assay Types
Assay designs are based on
assay types, which are "templates" corresponding to a specific instrument or assay process.
Standard Assay (Recommended)
The most flexible type of assay is the "Standard Assay" (previously referred to as a "general purpose assay type" or GPAT). This type includes a minimal set of built in properties and supports a variety of extensions including:
- Assay QC states and reporting
- Plate support
The base properties in a Standard Assay are outlined in this topic:
Specialty Assays (Premium Feature or Developer-Defined)
Instrument-specific assay types pre-define many fields and properties appropriate for the particular instrument, which can be further refined as needed. If a developer has defined a custom module-based assay, it will also be listed on this tab. This does not require a premium edition, but does involve file-based module development. Learn more
here.
Properties for several of the built-in specialty types available with Premium Editions are outlined in these topics:
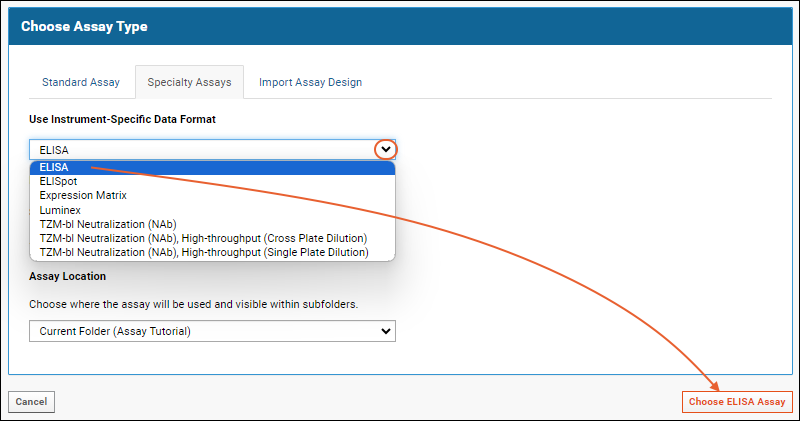
When creating a specialty assay, you will click the
Specialty Assays tab and select the desired type from the
Use Instrument Specific Data Format dropdown. You will set the location as for a standard assay and then click
Choose [TYPE] Assay to
define properties as described [above.

Other Ways to Create Assay Designs
Use an Existing Assay Design as a Template
You can also create a new assay design by copying from an existing design that is closer to your needs than any of the built in types. See
Manage an Assay Design.
Infer an Assay Design from Spreadsheet Data
Another way to create an assay design is to infer it from a sample spreadsheet, then edit to change the fields and properties as needed.
- Upload the sample spreadsheet to the file browser in the desired folder.
- Select it and click Import Data.
- In the popup, select the option you want, usually Create New Standard Assay Design.
- Provide a name and adjust the information inferred from the file.
- Click Begin Import or use Show Assay Designer to make further changes.
- In particular, if your field names include any special characters (including spaces) you should use the assay designer to adjust the inferral to give the field a more 'basic' name move the original name to the Label and Import Aliases field properties. For example, if your data includes a field named "CD4+ (cells/mm3)", you would put that string in both Label and Import Aliases but name the field "CD4" for best results.
- If you use Show Assay Designer, then after you save, you will be taken to the first step of importing the data. You may Cancel at this point to save the new design without actually importing the data.
Note that LabKey does have a few reserved names in the assay framework, including "container, created, createdBy, modified, and modifiedBy", so if your spreadsheet contains these columns you may encounter mapping errors if you try to create a new assay from it. You can work around this issue during assay design creation by editing the names of these columns and using the Advanced > Import Aliases option to map the original name to the new name you added.
Use an Assay Design Exported in a XAR Archive
Assay designs are included in
XAR archives. To import an assay design from a XAR file, review this topic:
Export/Import Assay Design.
Related Topics
