Step 4: Handle Protected Health Information (PHI) |
2025-07-12 |
Data exported from LabKey Server can be protected by:

 If instead you selected "Limited PHI" as the level to include, you would have seen the "Country" column but not the "Height" column.
- Randomizing participant ids so that the original participant ids are obscured.
- Shifting date values, such as clinic visits. (Note that dates are shifted per participant, leaving their relative relationships as a series intact, thereby retaining much of the scientific value of the data.)
- Holding back data that has been marked as a certain level of PHI (Protected Health Information).
Examine Study Data
First look at the data to be exported.- Navigate to the Security Tutorial > Study folder.
- Click the Clinical and Assay Data tab. This tab shows the individual datasets in the study. There are two datasets: "EnrollmentInfo" and "MedicalExam".
- Click MedicalExam. Notice the participant ids column, and choose a number to look for later, such as "r123". When we export this table, we will randomize these ids, obscuring the identity of the subjects of the study.
- Click the Clinical and Assay Data tab.
- Click EnrollmentInfo. Notice the dates in the table are almost all from April 2008. When we export this table, we will randomly shift these dates, to obscure when subject data was actually collected. Notice the enrollment date for the participant id you chose to track from the other dataset.
- Notice the columns for Height and Country. We will mark these as different levels of PHI so that we can publish results without them.
Mark PHI Columns
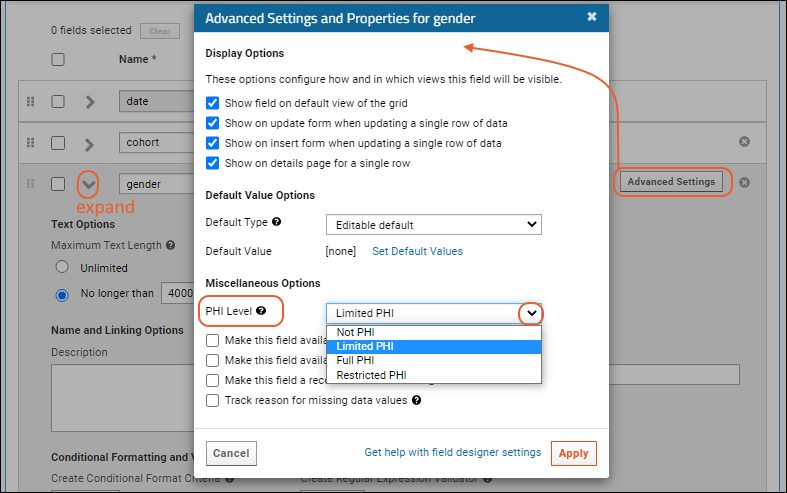
We will mark two columns, "Height" and "Country" as containing different levels of PHI. This gives us the opportunity to control when they are included in export. If we are exporting for users who are not granted access to any PHI, the export would not include the contents of either of these columns. If we exported for users with access to "Limited PHI", the export would include the contents of the column marked that way, but not the one marked "Full PHI."- Click the Manage tab. Click Manage Datasets.
- Click EnrollmentInfo and then Edit Definition.
- Click the Fields section.
- Expand the country field.
- Click Advanced Settings.
- As PHI Level, select "Limited PHI" for this field.
- Click Apply in the popup to save the setting.
- Repeat for the Height field, selecting "Full PHI".
- Scroll down and click Save.
Set up Alternate Participant IDs
Next we will configure how participant ids are handled on export, so that the ids are randomized using a given text and number pattern. Once alternate IDs are specified, they are maintained internally so that different exports and publications from the same study will contain matching alternates.- Click the Manage tab.
- Click Manage Alternate Participant IDs and Aliases.
- For Prefix, enter "ABC".
- Click Change Alternate IDs.
- Click OK to confirm: these alternate IDs will not match any previously used alternate IDs.
- Click OK to close the popup indicating the action is complete.
- Click Done.
Notice that you could also manually specify the alternate IDs to use by setting a table of participant aliases which map to a list you provide.
Export/Publish Anonymized Data
Now we are ready to export or publish this data, using the extra data protections in place.The following procedure will "Publish" the study, meaning a new child folder will be created and selected data from the study will be randomized and copied to it.- Return to the Manage tab.
- Scroll down and click Publish Study.
- Complete the wizard, selecting all participants, datasets, and timepoints in the study. For fields not mentioned here, enter anything you like.
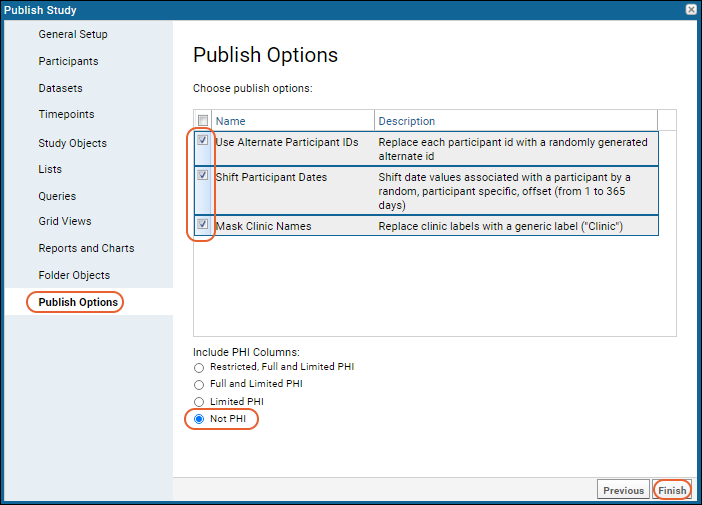
- On the Publish Options panel, check the following options:
- Use Alternate Participant IDs
- Shift Participant Dates
- You could also check Mask Clinic Names which would protect any actual clinic names in the study by replacing them with a generic label "Clinic."
- Under Include PHI Columns, select "Not PHI". This means that all columns tagged "Limited PHI" or higher will be excluded.
- Click Finish.
- Wait for the publishing process to finish.
- Navigate to the new published study folder, a child folder under Study named New Study by default.
- On the Clinical and Assay Data tab, look at the published datasets EnrollmentInfo and MedicalExam.
- Notice how the real participant ids and dates have been obscured through the prefix, pattern, and shifting we specified.
- Notice that the Height and Country fields have been held back (not included in the published study).
Security for the New Folder
How should you configure the security on this new folder?The answer depends on your requirements.- If you want anyone with an account on your server to see this "deidentified" data, you would add All Site Users to the Reader role.
- If want only members of the study team to have access, you would add Study Group to the desired role.