REDCap Survey Data Integration |
2025-07-05 |
Premium Feature — Available in the Professional and Enterprise Editions of LabKey Server. Also available as an Add-on to the Starter Edition. Learn more or contact LabKey.
LabKey Server can import data collected using REDCap (Research Electronic Data Capture) online surveys and forms. Existing REDCap projects can be directly imported into a LabKey Server study using the REDCap API. You can either import the REDCap data into an existing study, or use it as the demographic basis for a new study.
- REDCap Data Objects
- Enable the REDCap Module
- Connect and Configure External Reloading
- Example Configuration File
- Troubleshooting: Disable Creation of Lookup Lists
REDCap Data Objects
REDCap data objects are imported into LabKey Server as follows:| REDCap data object | LabKey Server data object | Notes |
|---|---|---|
| form00000000000000 | dataset0000000000000000000000 | Forms are imported as LabKey Server study datasets. You can specify which forms should be imported as demographic datasets using the configuration property demographic. |
| event | visit or date | Events are imported as either LabKey Server visits or dates. You can specify 'visit' or 'date' import using the configuration property timepointType. |
| multi-choice fields | lookups | Multiple choice fields are imported as lookups. Possible values are imported into Lists. The name of the created List either follows the naming convention <Multi-Choice-Field-Name>.choices OR, if multiple tables use the same multiple choices, a common list named like "shared_1.choices" will be created. Note that multi-choice fields names longer than 56 characters cannot currently be imported, because LabKey limits the length of List names to 64 characters. |
Notes:
- REDCap forms must have the status complete to be imported. If forms are marked 'incomplete,' the data structure will be created, but it will be empty.
- If you are importing into a visit-based study, REDCap must either include events or set a default event. Date-based studies require choosing a date field for each dataset.
Shared Lookup Lists
When a REDCap import including multi-choice files would create duplicate lists in LabKey, such as when many questions have a Yes/No answer, the system will only create a single lookup list for all of the lookups, containing the values used.LabKey will consider the list the same if:- Key/values match exactly.
- Key/values can appear in any order, i.e. the matching determination is not order dependent.
- All key/value pairs must match. We do not consider subsets as a match.
Enable the REDCap Module
- In your study folder, go to: > Folder > Management and click the Folder Type tab.
- Under Modules, place a checkmark next to REDCap.
- Click Update Folder.
Connect and Configure External Reloading
- In your study folder, click the Manage tab.
- Click Manage External Reloading.
- Click Configure REDCap.
- Configure connections and reloading on the three tabs:
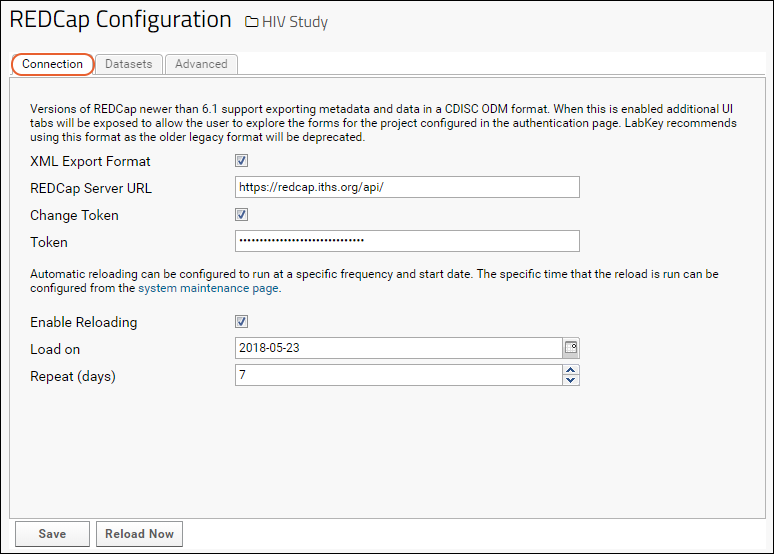
- Connection - Use this tab to specify the REDCap server you intend to draw data from. You can also define a recurring schedule to automatically reload the data.
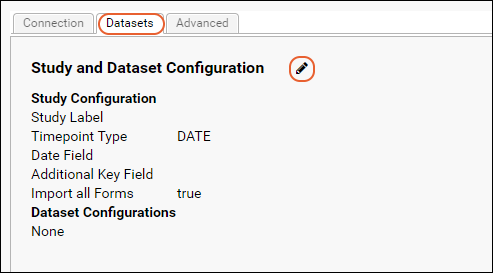
- Datasets - Use this tab to specify import behavior for individual REDCap forms. For example, you can import a given form into LabKey as either a dataset (the default behavior) or as a List. You can specify the timepoint type (visit or date), and additional keys when required.
- Advanced - Use this tab to define advanced configurations using XML.
Connection Tab
The information you enter here sets up communication between LabKey Server and a REDCap server (or servers). For each REDCap project you wish to load data from, there must be a separate row of connection information.

- XML Export Format: If your REDCap project supports the CDISC format, confirm that this is checked to proceed. Remove this checkmark if your REDCap project does not support the CDISC format or if you are using a REDCap version before 6.12. Documentation for the earlier non-CDISC format is available in the documentation archive at REDCap Legacy Import.
- REDCap Server URL: The URL of the target REDCap server. The URL should end with 'api/', for example: https://redcap.myServer.org/api/
- Change Token: Check the box to change the authorization token.
- Token: A hexidecimal value used by the REDCap server to authenticate the identity of LabKey Server as a client. Get the token value from your REDCap server, located on the REDCap API settings page of the project you are exporting from.
- Enable Reloading: (Optional). Place a checkmark here to start reloading on a schedule defined below.
- Load On: Optional. Set the start date for the reloading schedule.
- Repeat (days): Optional. Repeat the reload after this number of days.
- Save: Create a connection to the REDCap server. After clicking Save you can refine the import behavior on the Datasets tab. For details see Medidata / CDISC ODM Integration.
- Reload Now: Loads the data from REDCap on demand.

Datasets Tab
- Click the Datasets tab to configure study properties and per-dataset import behavior.
- Click the (pencil) icon.
 Here you can edit settings including:
- Whether the target study is visit or date based.
- For date based studies, you can specify the name of the column containing the date.
- For visit based studies, you can provide a default sequence number.
- Whether to import all datasets with shared defaults or add per-dataset definitions for:
- Whether the dataset is demographic, clinical, or has a third key.
- Whether it should be imported as a list (instead of a dataset).
- Which column to use as the date field or what the default sequence number should be (if these differ from the study-wide settings on the previous page.
Advanced Tab
The Advanced tab lets you control advanced options using XML. After completing the Datasets tab, XML will be auto-generated for you to use as a template.For details about the namespace and options available, review the REDCap XSD schema file.
Note that the XML used to configure REDCap and that used to configure Medidata/CDISC ODM reloads are not inter-compatible.
Available configuration options are described below:
- serverUrl: Required. The URL of the REDCap server api (https://redcap.test.org/redcap/api/).
- projectName: Required. The name of the REDCap project (used to look up the project token from the netrc file). The projectName must match the project name entered on the Authentication tab.
- subjectId: Required. The field name in the REDCap project that corresponds to LabKey Server's participant id column.
- timepointType: Optional. The timepoint type (possible values are either 'visit' or 'date'), the default value is: 'date'.
- matchSubjectIdByLabel: Optional. Boolean value. If set to true, the import process will interpret 'subjectId' as a regular expression. Useful in situations where there are slight variations in subject id field names across forms in the REDCap project.
- duplicateNamePolicy: Optional. How to handle duplicate forms when exporting from multiple REDCap projects. If the value is set to 'fail' (the default), then the import will fail if duplicate form names are found in the projects. If the value is set to 'merge', then the records from the duplicate forms will be merged into the same dataset in LabKey Server (provided the two forms have an identical set of column names).
- formName: Optional. The name of a REDCap form to import into LabKey Server as a dataset.
- dateField: Optional. The field that holds the date information in the REDCap form.
- demographic: Optional. Boolean value indicating whether the REDCap form will be imported into LabKey Server as a 'demographic' dataset.
Example Configuration File
<red:redcapConfig xmlns:red="http://labkey.org/study/xml/redcapExport">
  <red:projects>
    <red:project>
      <red:serverUrl>https://redcap.test.org/redcap/api/</red:serverUrl>
      <red:projectName>MyCaseReports</red:projectName>
      <red:subjectId>ParticipantId</red:subjectId>
      <red:matchSubjectIdByLabel>true</red:matchSubjectIdByLabel> <!--Optional-->
      <red:demographic>true</red:demographic> <!--Optional-->
      <red:forms>  <!--Optional-->
        <red:form>
          <red:formName>IntakeForm</red:formName>
          <red:dateField>StartDate</red:dateField>
          <red:demographic>true</red:demographic>
        </red:form>
      </red:forms>
    </red:project>
  </red:projects>
  <red:timepointType>visit</red:timepointType> <!--Optional-->
  <red:duplicateNamePolicy>merge</red:duplicateNamePolicy> <!--Optional-->
</red:redcapConfig>
Troubleshooting: Disable Creation of Lookup Lists
In some situations where your REDCap data has many columns, and where there are many lookups, you may run into the limits of the number of columns on the underlying database. In such a case you might see an error like:org.postgresql.util.PSQLException: ERROR: target lists can have at most 1664 entries
<cdiscConfig xmlns="http://labkey.org/cdisc/xml">
  <studyLabel>redcap Study</studyLabel>
  <timepointType>VISIT</timepointType>
  <importAll>true</importAll>
  <disableLookups>true</disableLookups>
</cdiscConfig>