Configure SAML Authentication |
2024-04-19 |
Premium Feature — Available with all Premium Editions of LabKey Server. Learn more or contact LabKey.
LabKey Server supports SAML (Security Assertion Markup Language) authentication, acting as a service provider to authenticate against a SAML 2.0 identity provider. You can configure LabKey Server to authenticate against a single SAML identity provider (IdP). LabKey Server supports either plain text or encrypted assertion responses from the SAML identity provider. Note that nameId attribute in the assertion must match the email address in the user's LabKey Server account.
- SAML Terminology
- How SAML Authentication Works
- Set Up Steps
- Create a New SAML Authentication Configuration
- Edit an Existing SAML Configuration
- Troubleshooting
- SAML Functionality Not Currently Supported
SAML Terminology
- IdP: Identity Provider. The authenticating SAML server. This may be software (Shibboleth and OpenAM are two open source software IdPs), or hardware (e.g., an F5 BigIp appliance with the APM module). This will be connected to a user store, frequently an LDAP server.
- SP: Service Provider. The application or server requesting authentication.
- SAML Request: The request sent to the IdP to attempt to authenticate the user.
- SAML Response: The response back from the IdP that the user was authenticated. A request contains an assertion about the user. The assertion contains one or more attributes about the user. At very least the nameId attribute is included, which is what identifies the user.
How SAML Authentication Works
From a LabKey sign in page, or next to the Sign In link in the upper right, a user clicks the admin-configured "SAML" logo. LabKey generates a SAML request, and redirects the user's browser to the identity provider's SSO URL with the request attached. If a given SAML identity provider is configured as the default, the user will bypass the sign in page and go directly to the identity provider.The identity provider (IdP) presents the user with its authentication challenge. This is typically in the form of a login screen, but more sophisticated systems might use biometrics, authentication dongles, or other two-factor authentication mechanisms.If the IdP verifies the user against its user store, a signed SAML response is generated, and redirects the browser back to LabKey Server with the response attached.LabKey Server then verifies the signature of the response, decrypts the assertion if it was optionally encrypted, and verifies the email address from the nameId attribute. At this point, the user is considered authenticated with LabKey Server and directed to the server home page (or to whatever page the user was originally attempting to reach).Auto Create Authenticated Users
If a user is authenticated by the SAML server but does not already have an account on the LabKey Server, the system can create one automatically. This is enabled by default but can be disabled using a checkbox in the global settings of the authentication page.Set Up Steps
Before you begin, ensure that you can log in using standard database configuration (i.e. that you have not disabled this default login mechanism). You may need it to recover if you make a configuration error.1. First, you will set up your SAML Identity Provider and obtain an IdP signing certificate, and provide other details including the full ACS URL where the login will redirect for authentication. This URL is composed of these elements:- The base server URL, sometimes also referred to as the "Entity" or the "Identifier".
- If your server uses "labkey.xml", a context-path of "/labkey". If your server uses "ROOT.xml" this is omitted.
- The "configuration" parameter which must match the configuration on LabKey Server. This parameter is an incrementing integer (beginning at 1). Unless you know that you have already configured other SAML configurations on LabKey, you will start by using "1".
http://localhost:8080/saml-validate.view?configuration=1
Create a New SAML Authentication Configuration
- Go to (Admin) > Site > Admin Console.
- In the Configuration section, click Authentication.
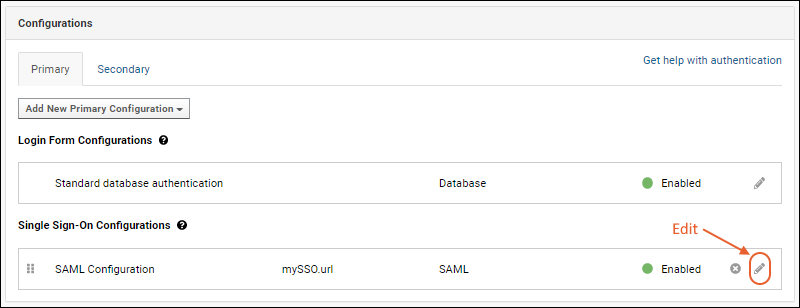
- On the Primary tab of the Configurations panel, select Add New Primary Configuration > SAML...

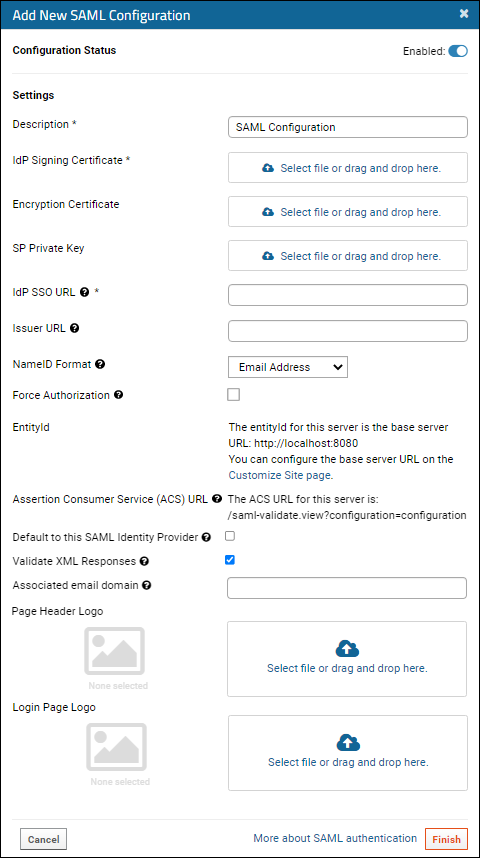
- In the popup, configure the properties as described below.
- Click Finish to save.
Note that the configuration settings make use of the encrypted property store, so in order to configure/use SAML, an Encryption Key must be set in the application.properties file. If a key is not set, attempting to go to the SAML configuration screen displays an error message, directing the administrator to fix the configuration.
 Configure the properties for SAML authentication:
- Configuration Status: Click the slider to toggle between:
- Enabled
- Disabled
- Description: Provide a unique description of this provider.
- IdP Signing Certificate (Required): Either drag and drop or click to select a pem file.
- Encryption Certificate (Optional): The encryption certificate for the service provider (SP). Use this field and the SP Private Key field (below) if you want the assertion in the SAML response to be encrypted. These two fields work together: they either must both be set, or neither should be set.
- SP Private Key (Optional): The private key for the service provider (SP). Use this field and the Encryption Certificate field (above) if you want the assertion in the SAML response to be encrypted. These two fields work together: they either must both be set, or neither should be set.
- IdP SSO URL (Required): The target IdP (identity provider) URL for SSO authentication, where the SAML identity provider is found.
- Issuer URL: The issuer of the service provider SAML metadata. Some IdP configurations require this, some do not. If required, it's probably the base URL for the LabKey Server instance.
- NameID Format (Optional): This is the NameIdformat specified in the SAML request. Options are:
- Email Address (Default)
- Transient
- Unspecified
- Force Authorization: If checked, require the user to login again via IdP, even if they are already logged in via an SSO provider.
- EntityId: The base server entity id is shown here and can be reconfigured if necessary. Learn more below.
- Assertion Customer Service (ACS) URL: The ACS URL for this server is a combination of the base server EntityID and "saml-validate.view?configuration=" followed by a "configuration" parameter that will be supplied for you when you save. Learn more below.
- Default to this SAML Identity Provider: Check the box to redirect the login page directly to this SAML identity provider instead of requiring the user to click on a logo first.
- Validate XML Responses: We strongly recommend validating XML responses from the IdP. Uncheck this only if your network infrastructure blocks the server's access to http://w3.org.
- Page Header Logo / Login Page Logo: Provide a logo image to use in the page header or on the login page, or both.
- These logos will be presented as quick links to access your authentication system.
- Learn more about logo fields for Single Sign-On authentication here: Single Sign-On Logos.
- Click Finish in the popup to save.
EntityId / entity_id (Base Server URL)
Note that the Base Server URL is included in the SAML request as the EntityId / entity_id. To control the Base Server URL, use the "Customize Site page" link in the UI or:- Go to (Admin) > Site > Admin Console.
- Under Configuration, click Site Settings.
- On the Customize Site page, change the Base Server URL as necessary.
Assertion Customer Service (ACS) URL
The ACS URL you'll provide in the LabKey Server configuration UI must match that expected by the SAML Identity Provider.It is a combination of the base server EntityID, a possible "/labkey" context-path, and "saml-validate.view?configuration=" followed by a "configuration" parameter that will be supplied for you when you save.- When you first create a SAML configuration, the word "configuration" is shown as the value of this parameter, but it will be replaced with an integer upon save.
- Immediately after saving, edit the configuration to see the final URL and the configuration parameter value that was assigned.
- Your SAML identity provider must be configured to redirect to this URL at the end of the authentication process.
Edit an Existing SAML Provider
- Go to (Admin) > Site > Admin Console.
- In the Configuration section, click Authentication.
- Click the (pencil) next to the target SAML configuration to edit the configuration.

- After making changes, click Apply in the popup, then Save and Finish to exit the authentication page.
Troubleshooting
Configuration ID
If you see a message similar to "Unable to validate authentication. SAML configuration id not found." you may be able to work around it by clearing cookies in your browser.If that is not effective, log into your LabKey Server directly (via standard database authentication), and check the SAML configuration page. Edit the configuration to see the configuration parameter supplied for the ACS URL field, as well as the Base Server URL. Configure your SAML identity provider to include this parameter in whichever URLs your IdP requires, such as "Reply URL", "Sign-on URL", "Destination URL", and/or "Recipient URL".Using SAML with Load Balancers
If you are using a Load Balancer (e.g. AWS Application Load Balancer, Nginx, Apache, etc), you may need to edit your server.xml file to configure the expected ports.For instance, if the load balancer is configured to work on port 443, but in application.properties your server.port is set to use 8080, you'd need to update that setting to 443 so it matches your load balancer.SAML Functionality Not Currently Supported
- Metadata generation - LabKey Server supports only static service provider metadata xml.
- Metadata discovery - LabKey Server does not query an IdP for its metadata, nor does the server respond to requests for its service provider metadata.
If your IdP requires Service Provider XML Metadata, you can generate the XML using a tool such as: https://www.samltool.com/sp_metadata.php
- Federation participation is not supported.
- More complex scenarios for combinations of encrypted or signed requests, responses, assertions, and attributes are not supported. For example, signed assertions with individually encrypted attributes.
- Processing other attributes about the user. For example, sometimes a role or permissions are given in the assertion; LabKey Server ignores these if present.
- Interaction with an independent service provider is not supported.
- Single logout (SLO)