This topic covers adding samples to a Sample Type
that has already been created by an administrator. Editing samples can also be accomplished using the update /merge options during file import.
Add an Individual Sample
- When viewing the grid of a sample type, select (Insert Data) > Insert New Row from the grid menu.
- Enter the properties of the new sample.
- You can provide values for your custom properties, as well as the default system properties, including the expiration date and amount of the sample (with units).
- Click Submit.
Import Bulk Sample Data
- In the Sample Types web part, click the name of the sample type.
- Click Import More Samples or Click (Insert Data) > Import Bulk Data to reach the same input page.
On the
Import Data page:
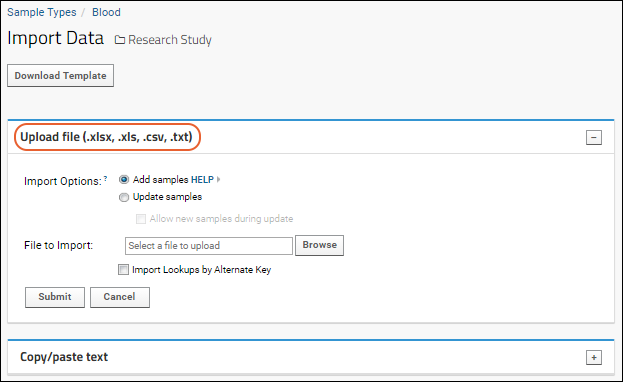
- Download Template: This button downloads a file template showing necessary and optional columns (fields) for your sample type.
- Choose either Upload file or Copy/paste text.
Upload File
Upload file (.xlsx, .xls, .csv, .txt): Open this panel to upload a data file from your local machine.
- File to Import: Opens a file selection panel, browse to your data file and submit it.
- Import Lookups by Alternate Key: When importing lookups, you can check this box to use a key other than the primary key.

Copy/Paste Text
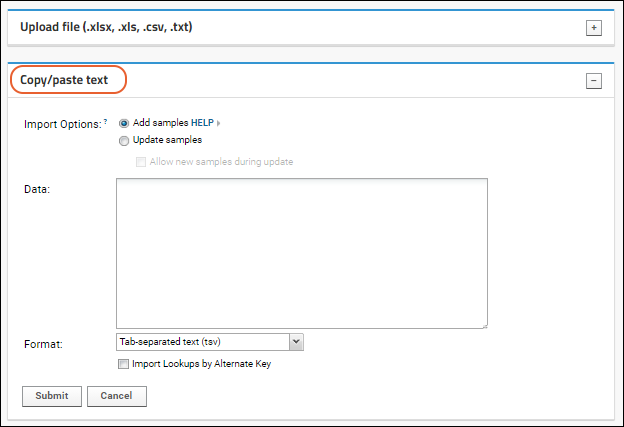
Copy/paste text: Open this panel to directly copy/paste the data into a text box.
- Import Options: Update data for existing samples during import is available using the checkbox.
- Data: Paste the data. The first row should contain column names (which are mapped to field names).
- Select the appropriate Format for the pasted data:
- Tab-separated text (TSV) or
- Comma-separated text (CSV)
- Import Lookups by Alternate Key: When importing lookups, you can check this box to use a key other than the primary key.

Update Existing Samples or Merge During Import
Under
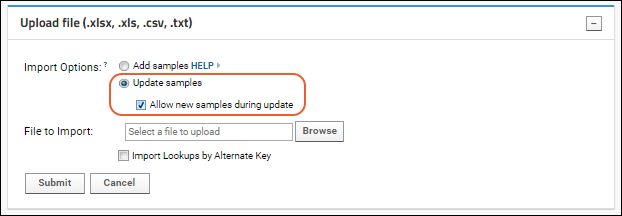
Import Options during either file or copy/paste import, the default is
Add samples. If any rows match existing samples, the import will fail.
To
Update samples, select this option and import data for existing samples. When you check the
Allow new samples during update box, you can import and merge both existing and new sample rows.

Use the update option to
update lineage of samples, including parent information, inputs, sources, etc.
- Change parent information: By including revised parent information, you can change any existing parent sample relationships.
- Delete parents/sources: Deleting the parents of a sample is accomplished by updating existing sample data with parent columns empty.
- Note that if a sample has more than one type of parent (either data classes or other samples), changing or deleting parents of one type will not change the relationships to other types of parents not specified in the merged data.
Import Using the API
Learn how to import Sample Type and Data Class data via the JavaScript API in this topic:
Use the Registry API
Premium Resource AvailableSubscribers to Premium Editions of LabKey Server can find an example of splitting a large upload into chunks in this topic:
Learn more about premium editions
Provide Amount and Units During Sample Creation
For any sample creation method, you can specify the storage amount and units, provided these
default system fields are enabled. The StoredAmount column is labeled "Amount"; the Units field is labeled "Units". Importing data via a file will map a column named either "Amount" or "StoredAmount" to the StoredAmount field.
Both the StoredAmount and Units fields have display columns attached to them and, when a Sample Type has a display unit defined (as is typical in both the Sample Manager and Biologics LIMS), the value displayed in the StoredAmount column will be the amount converted to that display unit. The Units column will show the display value if a sample type has one defined.
Because this display column could prevent users from seeing the data as entered, we also provide two new columns "RawAmount" and "RawUnits", which present the data as stored in the database. These columns are hidden by default but can be added via customizing a samples grid.
Related Topics


 Use the update option to update lineage of samples, including parent information, inputs, sources, etc.