A list is a flexible, user-defined table. To manage all the lists in a given container, an administrator can select
(Admin) > Manage Lists, or click
Manage Lists in the
Lists web part.
Manage Lists
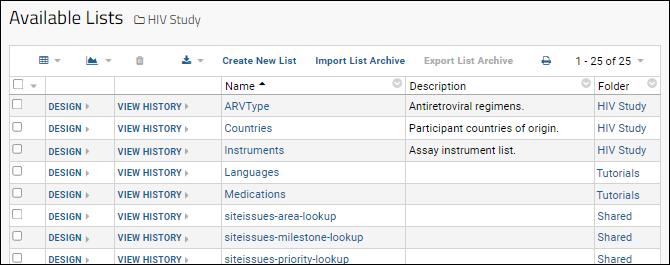
An example list management page from a study folder:

- (Grid Views): Customize how this grid of lists is displayed and create custom grid views.
- (Charts/Reports): Add a chart or report about the set of lists.
- (Delete): Select one or more lists using the checkboxes to activate deletion. Both the data and the list design are removed permanently from your server.
- (Export): Export to Excel, Text, Script, or RStudio (when configured).
- Create New List
- Import List Archive
- Export List Archive: Select one or more lists using the checkboxes and export as an archive.
- (Print): Print the grid of lists.
Shared List Definitions
The
definition of a list can be in a local folder, in the parent project, or in the "/Shared" project. In any given folder, if you select
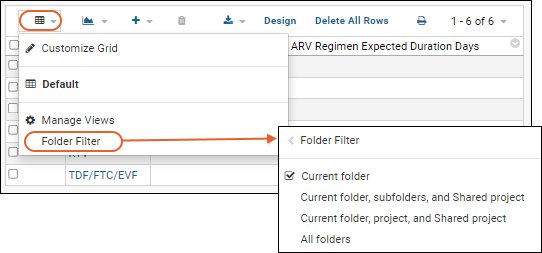
(Grid Views) > Folder Filter, you can choose the set of lists to show. By default, the grid folder filter will show lists in the "Current Folder, Project, and Shared Project".
Folder filter options for List definitions:
- Current folder
- Current folder and subfolders
- Current folder, project, and Shared project (Default)
- All folders
When you add
data to a list, it will be added in the local container, not to any shared location. The definition of a list can be shared, but the data is not, unless you customize the grid view to use a folder filter to expose a wider scope.
Folder filter options for List data:
- Current folder (Default)
- Current folder, subfolders, and Shared project
- Current folder, project, and Shared project
- All folders

Manage a Specific List
Actions for each list shown in the grid:
- Design: Click to view or edit the design, i.e. the set of fields and properties that define the list, including allowable actions and indexing. Learn more in this topic: Edit a List Design.
- View History: See a record of all list events and design changes.
- Click the Name of the list to see all contents of the list shown as a grid. Options offered for each list include:
- (Grid Views): Create custom grid views of this list.
- (Charts/Reports): Create charts or reports of the data in this list.
- (Insert data): Single row or bulk insert into the list.
- (Delete): Select one or more rows to delete.
- (Export): Export the list to Excel, text, or script.
- Click Design to see and edit the set of fields and properties that define the list.
- Click Delete All Rows to empty the data from the list without actually deleting the list structure itself.
- (Print): Print the list data.
Add Additional Indices
In addition to the primary key, you can define another field in a list as a key or index, i.e. requiring unique values. Use the
field editor Advanced Settings for the field and check the box to
Require all values to be unique.
Premium Resource AvailableSubscribers to premium editions of LabKey Server can learn how to add an additional index to a list in this topic:
Learn more about premium editions
View History
From the
> Manage Lists page, click
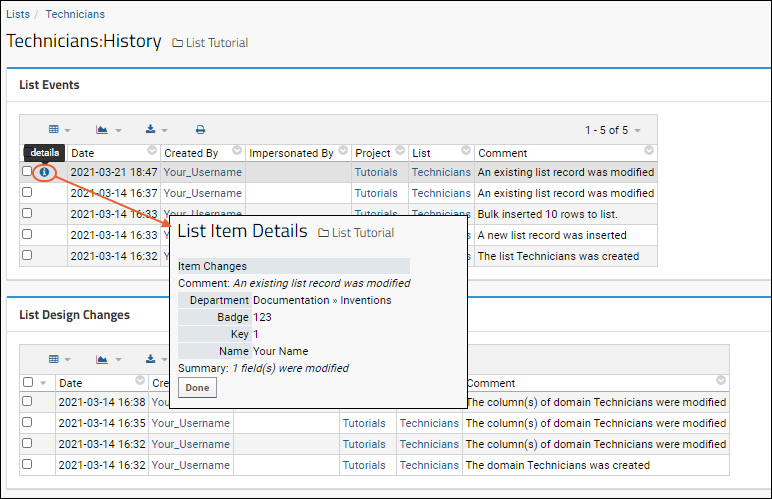
View History for any list to see a summary of audit events for that particular list. You'll see both:
- List Events: Change to the content of the list.
- List Design Changes: Changes to the structure of the list.
For changes to data, you will see a Comment "An existing list record was modified". If you hover, then click the
(details) link for that row, you will see the details of what was modified.

Related Topics