Set Up
Next create a new assay folder for this tutorial and add a files web part:
- Navigate to the Home folder
- Create a new folder to work in.
- Name: "ELISpot Tutorial".
- Folder Type: Assay.
- Click Next.
- On the Users/Permissions page, make no changes and click Finish.
- In the lower left, select Files from the <Select Web Part> dropdown.
- Click Add.
Upload Assay Data
- In a desktop file browser, navigate to the LabKeyDemoFiles directory you downloaded and unzipped.
- Drag and drop the directory into the upload area of the Files web part.
Configure An ELISpot Plate Template
- Click Manage Assays in the Assay List web part.
- Click Configure Plate Templates.
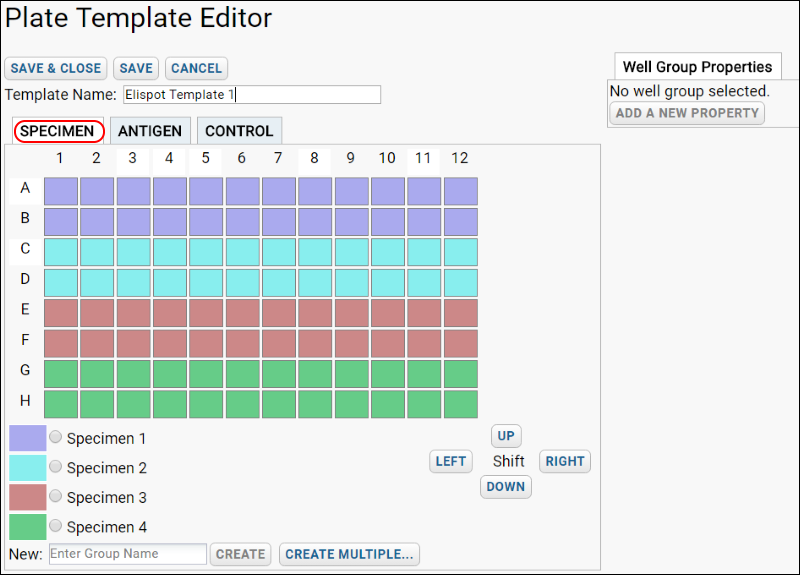
- Select New 96 Well (8x12) ELISpot Default Template to open the Plate Template Editor, which allows you to configure the layouts of specimens and antigens on the plate.
- Enter Template name: “ELISpot Template 1”
- Explore the template editor. On the Specimen tab, you will see the layout for specimens:

- Click the Antigen tab. You will see the layout for antigens.
- The Control tab can be used for defining additional well groups. For instance, if you are interested in subtracting background wells, see Background Subtraction for how to define a set of background wells.
- For this tutorial, we will simply use the default template. For customization instructions, see Edit Plate Templates.
- Click Save and Close.
You now have a new ELISpot plate template that you can use as a basis for creating new assay designs.
Create a New Assay Design Based on the Template
- Click the Assay Dashboard tab to return to the folder home page.
- In the Assay List webpart, click New Assay Design.
- Select ELISpot, then scroll down and choose "Current Folder (Elispot Tutorial)" as the Assay Location.
- Click Next.
- In the Assay Designer leave all fields unchanged except:
- Name: "ELISpot Assay".
- From the Plate Template dropdown, choose the new "ELISpot Template 1" if it is not already selected.
- Click Save and Close.
Import ELISpot Runs
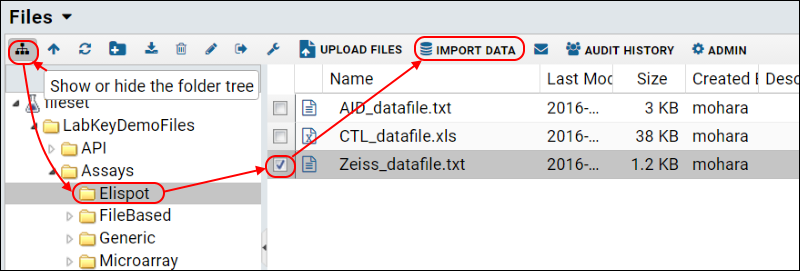
- In the Files web part, click the icon to show the folder tree.

- Navigate to LabKeyDemoFiles > Assays > ELISpot.
- Select Zeiss_datafile.txt.
- Click Import Data.
- Select Use ELISpot Assay and click Import.
Batch Properties:
- For Participant/Visit, select Specimen/sample id. (Do not check the box for "I will also provide participant id and visit id".)
- Click Next.
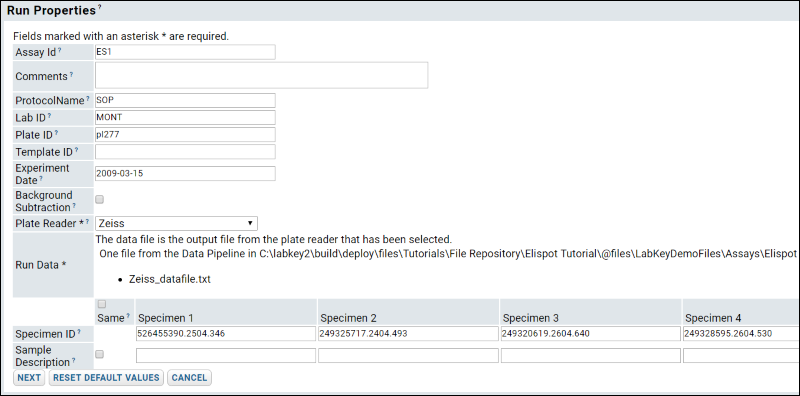
Run Properties:
- AssayID: ES1
- Protocol Name: SOP
- LabID: MONT
- PlateID: pl277
- Experiment Date: 2009-03-15
- Plate Reader: Select "Zeiss" from the pulldown list.
- Specimen IDs:
- Specimen id values are often barcoded on labels attached to the plates. Enter these sample barcodes (taken from the file "Specimen Barcodes.pdg" file in LabKeyDemoFiles\Specimens\Specimen Barcodes.pdg):
- 526455390.2504.346
- 249325717.2404.493
- 249320619.2604.640
- 249328595.2604.530
- Click Next.
 Antigen Properties
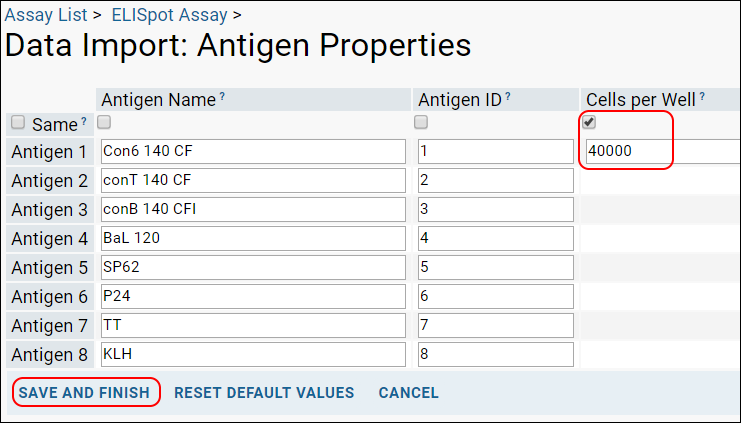
- Fill out the antigen properties according to the table below.
- Press Save and Finish when you are done.
- Notes:
- The cells/well applies to all antigens, so you can just fill in the first box in this column with "40000" and click the "Same" checkbox above the column.
- The antigen names shown are examples only - you may enter any values you wish.

Explore Imported Data
You will see a list of runs for the assay design. See
Review ELISpot Data for a walkthrough of the results and description of features for working with this data.
Copy Assay Data to the Demo Study (Optional Step)
As described in the general purpose assay tutorial, you can integrate this tutorial ELISpot data into a target study following the steps described in
Step 6: Integrate Assay Data into a Study. If you have entered matching participant and specimen IDs, you may simply select all rows to copy.
When the copy is complete, you will see the dataset in the target study. It will look similar to this
online example in the demo study on labkey.org.
