You can set up a study to allow users to add comments to participants, participant/visit pairs, specimens and vials, plus move and copy comments between these entities.
Topics. This page covers setup for different types of comments:
- Specimen-level and vial-level comments.
- Participant-level and participant-visit-level comments
Related topics:
Enable per-vial and per-specimen comments
If you only need to set comments on a per-vial or per-specimen basis, setup is simple. Steps:
- Go to a specimen or vial view (e.g., click on "By Individual Vial" in the "View All Specimens" section of the Specimens web part).
- Click the "Enable Comments/QC" button above the grid view.
Once you have enabled specimen and vial comments, you can proceed to the
User Guide for Comments for instructions on how to add these types of comments.
Enable per-participant and/or per-participant-visit comments
Setting up comments on a per-participant and/or participant-visit basis takes more steps than setting up vial-level and specimen-level comments.
The comments associated with a Participant or Participant/Visit are saved as fields in datasets. Each of the datasets can contain multiple fields, but only one field can be designated to hold the comment text. Comment fields must be of type text or multi-line text. Comments will appear automatically in colums for the specimen and vial views.
You will need to set up dedicated fields to hold participant and participant/visit comments. You do not need to set up both types of comments if you only wish to use one of them.
Create or add comment fieldsFor holding
participant-level comments, create a demographic-type dataset that includes a column for comments. Alternatively, you can add a column for comments to a pre-existing demographic dataset.
For holding
participant-visit-level comments, create non-demographic-type dataset that includes a column for comments. Alternatively, you can add a column for comments to a pre-existing, non-demographic dataset.
Note: Only users with read access to the selected dataset(s) will be able to view comment information. Make sure your users have appropriate permissions on comment datasets.
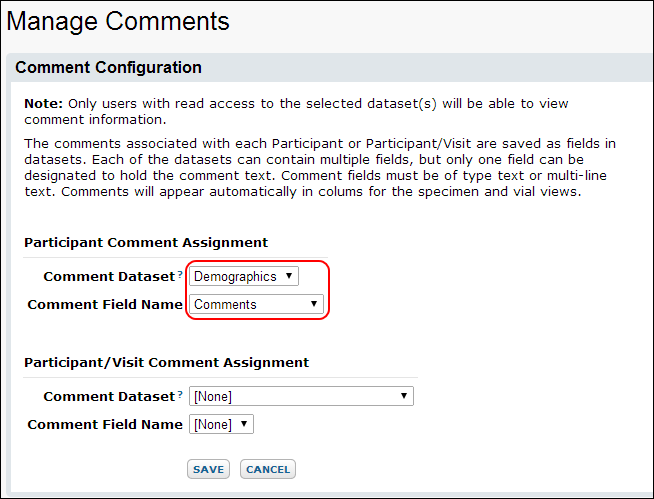
Access the "Manage Comments" UIAccess the "Manage Comments" page by going to the study's portal page, selecting "Manage Study" and then choosing "Manage Comments." The "Manage Comments" page for the
Demo Study looks as follows:
 Identify the datasets and columns/fields that will hold comments.Participant Comment Assignment
- Comment Dataset - The dataset selected must be a demographics dataset.
- Comment Field Name - This dropdown identifies the field in the selected dataset that holds participant-level comments.
Participant/Visit Comment Assignment
- Comment Dataset - The dataset selected cannot be a demographics dataset.
- Comment Field Name - This dropdown identifies the field in the selected dataset that holds participant-visit-level comments.
When finished, press "Save."
Add comments.Once you have enabled participant and/or participant/visit comments, you can proceed to the
User Guide for Comments for instructions on how to add these types of comments.
 Identify the datasets and columns/fields that will hold comments.Participant Comment Assignment