The simplest method for importing specimen data is to use a
Standard Specimen Repository and paste data from a simple specimen spreadsheet, described in this topic. Note that this import method does not support specimen request tracking. To use an advanced specimen repository and manage the transfer of specimens between labs, see the topic
Import a Specimen Archive.
Select Standard Specimen Repository
- On the Study project home page, select the Manage tab.
- Under Specimen Repository Settings, click Change Repository Type.
- Select Standard Specimen Repository.
- Click Submit.
Import Specimen Spreadsheet Data
- Go to the Study project home page and select the Specimen Data tab.
- In the Specimens webpart, expand the Administration topic.
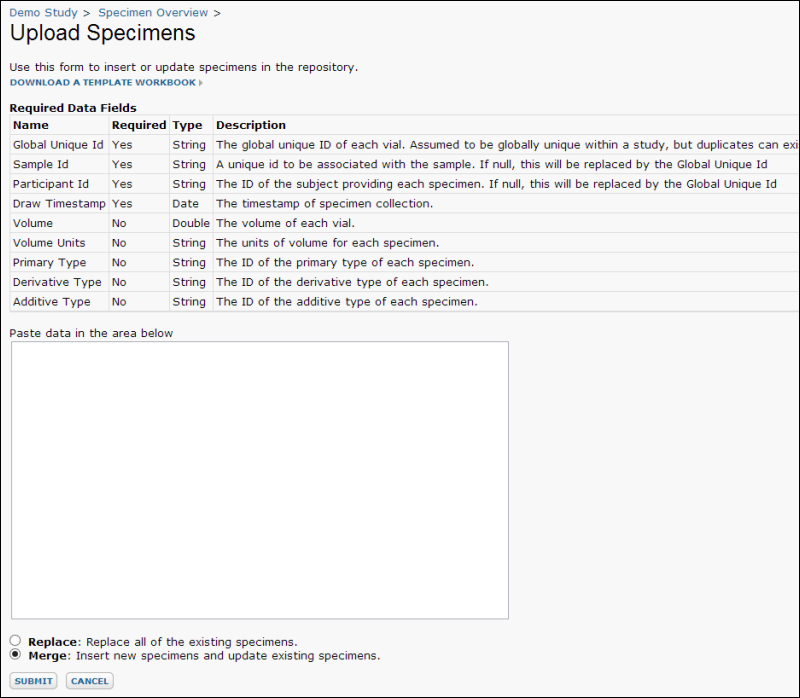
- Click Import Specimens to open the Upload Specimens page.
Show Expected Data Fields
To view data fields expected in the upload, click
Show Expected Data Fields.

This will expand a display of column names, types, brief descriptions, and whether the field is required for a successful upload. If your study is set up to use visits instead of date-based timepoints, you will see a
Visit field here in addition to
Draw Timestamp and draw timestamps will not be required.
Note that in cases where the Sample ID and/or Participant ID are the same as your Global Unique ID, you need only supply the Global Unique ID and leave the others null. They are still required fields, but will be populated on import automatically.

Download a Template Workbook
- Select Download a Template Workbook.
- Open this spreadsheet to confirm that your column headings match those in the template.
- Copy and paste your data into this template spreadsheet. In practice you could download this template in advance and enter the original data into it.
Download and view a sample template here:
specimen_template.xls
Select Replace or Merge
When uploading specimen data from a spreadsheet, you can either replace the existing repository with the new data, or merge new data into the existing repository. The
merge option will use the primary key to determine if a row is in the repository already. If so, it will delete and replace it. Otherwise, it will add new rows but leave any unchanged rows in place.
Warning. Specimen import via
replace replaces all specimens in the repository with a new list of specimens. Make sure not to accidentally delete needed specimen information by importing new specimen records.
Copy and Upload Data
- Copy the contents of the filled-in template file and paste this data into the text box on the Upload Specimens page.
- Select Replace or Merge, and click Submit.
- When the import is complete, click Specimens to see a grid view of all imported specimens.
Note that while the template column headings have changed to better match uploaded data headings, specimen upload is completely compatible with prior versions of the template.
 This will expand a display of column names, types, brief descriptions, and whether the field is required for a successful upload. If your study is set up to use visits instead of date-based timepoints, you will see a Visit field here in addition to Draw Timestamp and draw timestamps will not be required.Note that in cases where the Sample ID and/or Participant ID are the same as your Global Unique ID, you need only supply the Global Unique ID and leave the others null. They are still required fields, but will be populated on import automatically.