In order to demonstrate some of the features of the
Survey Designer, imagine that you are hosting a conference and wish to gather some advance information about the participants. To collect this information, you will set up a survey that the participants can complete online.
Survey Designer Set Up
First enable survey functionality in a folder. Each user taking the survey will need to have at least Editor permissions, so you will typically create a new folder such as
My Project > Conference Attendee Surveys to avoid wider access to other parts of your project.
- Go to or create a folder for your survey.
- Configure Editor permissions for each user.
- Select Admin > Folder > Management and click the Folder Type tab.
- Under Modules, place a checkmark next to Survey.
- Click Update Folder.
Next you will need to create a results table in which to store the responses.
- Create a new Lists web part.
- Click Manage Lists, then Create New List.
- Name your list SurveyResults.
- Change the Primary Key? identifier to "ParticipantID". (This will allow the survey to be integrated directly with demographic information.)
- Leave Primary Key Type? unchanged (as Auto-Increment Integer).
- Leave Import from File unchecked.
- Click Create List.
- Leave the defaults in List Properties.
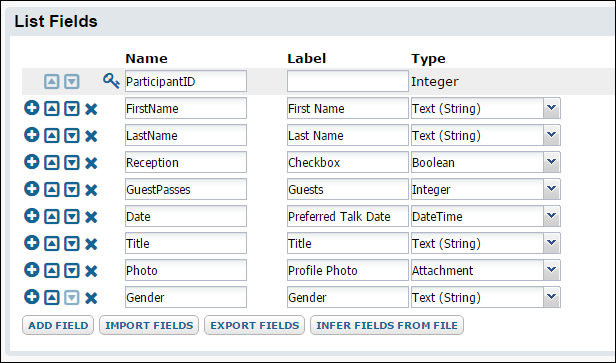
- Under List Fields, add the following fields. For each line, enter the information as shown and click Add Field.

- Click Save at the top of the page, then Done
Survey Design
The next step is to design the survey so that it will request the information needed in the correct types for your results table. The survey designer generates simple input fields labeled with the column name as the default questions presented to the person taking the survey.
- Click Start Page to return to your folder.
- Add a Survey Designs web part.
- Click Create Survey Design.
- Provide a Label (such as ConferenceAdvance in this example) and Description.
- From the Schema dropdown, select lists.
- From the Query dropdown, select your list, in this example: SurveyResults.
- Click Generate Survey Questions above the entry panel.
- Default survey questions are generated using the field information you used when you created your SurveyResults list. Notice the lower left panel contains documentation of the survey configuration options. It is possible to customize the survey at this point, but for now just use the defaults.
- Click Save Survey.
You can now use this design to create a survey which users can fill in to populate your results table.
Create and Populate The Survey
Create the Survey:
- Click Select Web Part, select Surveys, click Add.
- Survey Design dropdown: select your survey design (ConferenceAdvance).
- Click Submit.

Populate the survey:
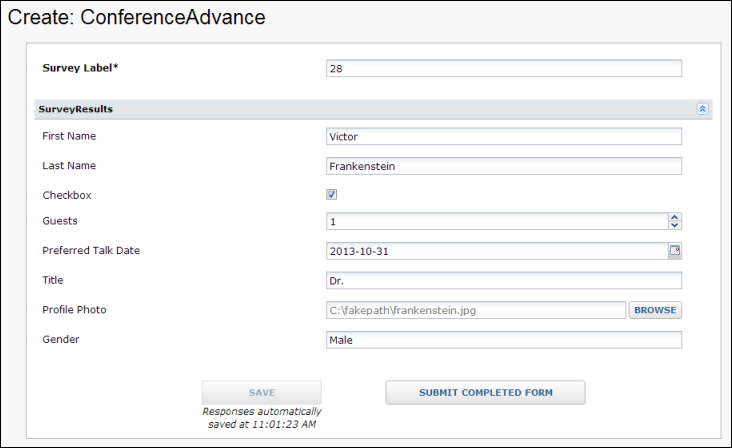
- Click Create Survey to launch the survey wizard and present the default questions based on your results table.
- Enter values for the given fields.

- Click Submit Completed Form to finish. There is also a Save button allowing the user to pause without submitting incomplete data. In addition, the survey is auto-saved periodically.
In practice, each conference participant will go to this folder and click
Create Survey to add their own information. As the host, you would view the
ConferenceAdvance table and use that data to print nametags, plan seating, etc.
You will have noticed that the 'questions' generated based on field names are not very helpful and would require external explanation, particularly in the case of the checkbox we included.
Next step