Once you have
configured at least one storage system with some terminal storage units, you can assign samples to the virtual location corresponding to their physical location. Any protocol about where to place samples of different types can be accommodated in this system.
To add samples to storage, the user must have been granted the
Storage Editor role. This applies to administrators as well as other users. This topic assumes the user has this role.
Start from the Storage System
Start from a Picklist or Grid of Samples
Start from the Storage System
Find Available Space
Start from the
Storage List on the application home page, or the Storage dashboard. You'll see a summary of storage and how many spaces are available for samples in each to guide you.

Click the name of the storage to open the details page.
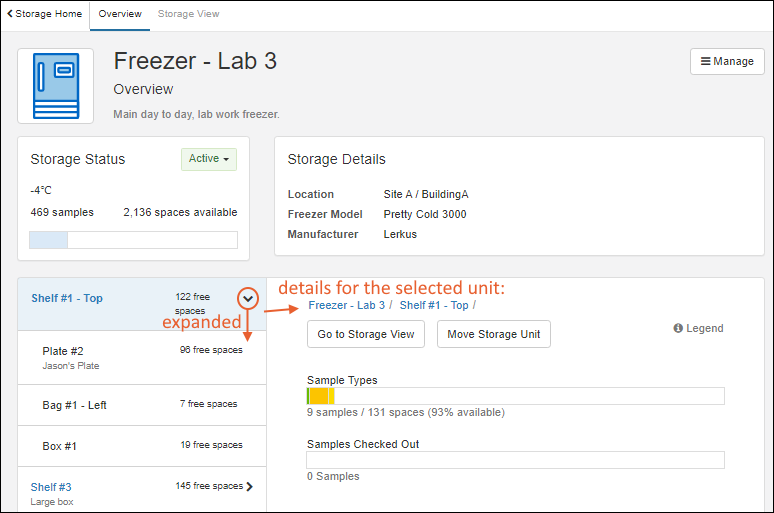
- Here you'll see the top level of the storage hierarchy you defined. A note of the number of free spaces in each section is provided to assist you.
- Click the to expand the nested hierarchy.
- Click any level to see more details in the panel on the right.
Continue to use the
to expand until you find enough capacity in terminal storage units where your samples can be stored.
Click any location in the left panel to show it's summary information on the right. You can only store samples in "terminal" storage locations: bags, boxes, canes, plates, and tube racks.
- Click Go to Storage View to open it.
- You can also click the location name in the 'breadcrumb' trail along the top of the panel.

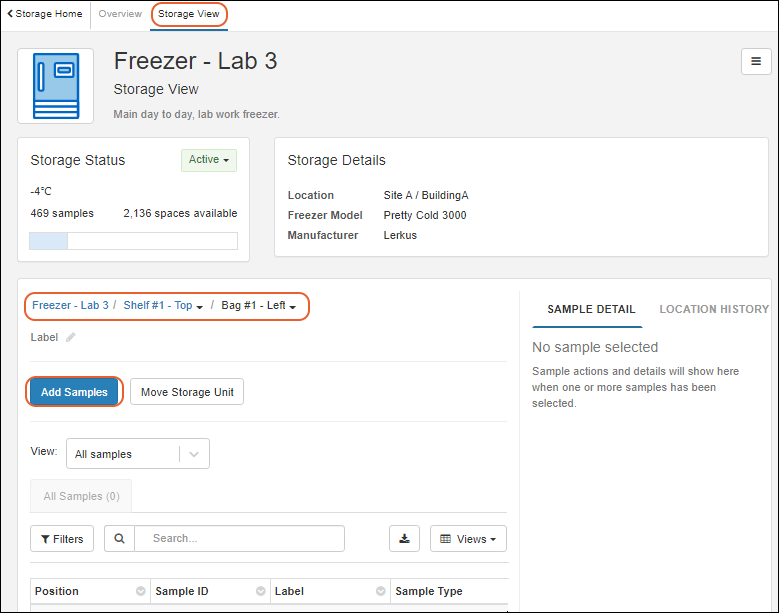
You are now on the
Storage View tab for this storage, open to the location you selected.
Select Space to Fill
There are two categories of terminal storage units to which you can add samples.
- 1. Bags and Canes use a simple numbering scheme for positions.
- For bags and canes, you don't need to do anything except click Add Samples to activate the sample panel on the right.
- 2. Boxes, Plates, and Tube Racks have a 2D layout of row and column positions (aka cells, spaces, wells, etc.) within the unit. You have two choices here:
- Click cells or drag within the layout to select a range of positions, as shown below, then click Add Samples. The selected positions will be eligible for placing samples.
- OR, click Add Samples without making any selection. All available positions will be eligible for placing samples.

Position Already Occupied
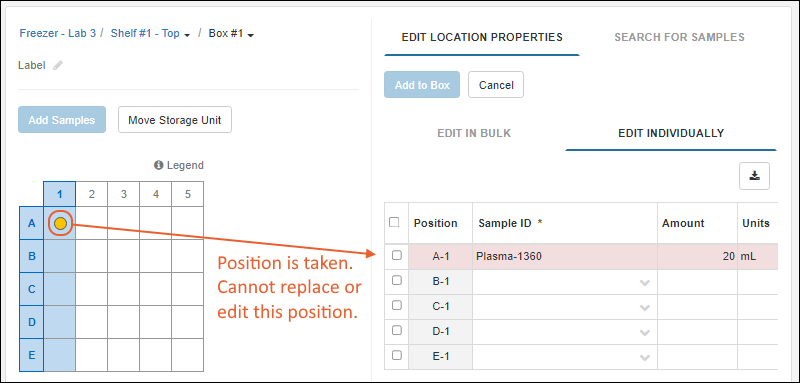
If you select a range of cells and one (or more) are already occupied by samples, you will see sample details for them on the right. When you click
Add Samples, you will still see the selected rows in the grid, but the occupied rows are shaded red and cannot be edited or used to place new samples.
Identify Samples to Store
Once you have clicked
Add Samples, the right side of the panel becomes your sample identification region.
Edit Location Properties
On the
Edit Location Properties tab, using the
Edit Individually tab, you can paste into the grid from a spreadsheet or by typing directly into the grid shown:

Values added to the
Sample ID column must already exist in the system. If you start typing you will see a narrowing list of available samples. Note that this means if you received a new set of samples, you must first add them to a Sample Type (or create a new one) and can then assign them to locations.
Search for Samples
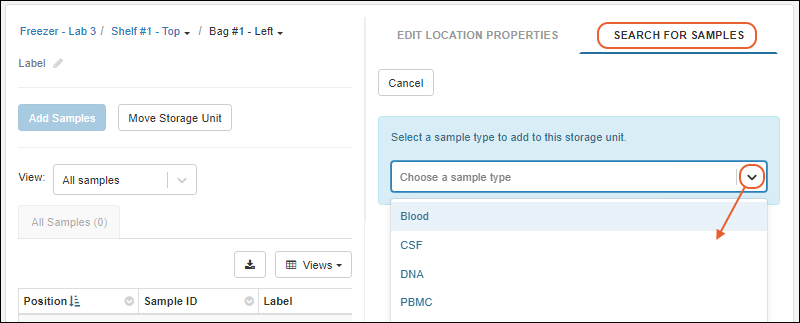
Click the
Search for Samples tab to get more assistance with finding specific samples.
First, select the desired Sample Type from the dropdown.
Once a Sample Type has been selected, you can:
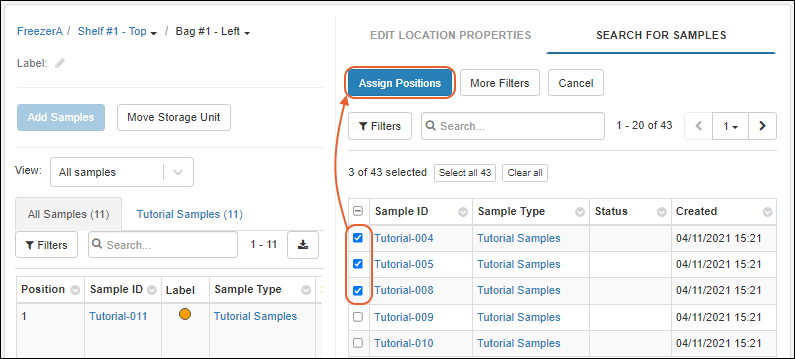
See below for how to
Assign Positions once you've identified the samples you want to store.
More Filters
Click
More Filters on the
Search for Samples tab to select on or more of the filter options:
- From Source: Select a specific source to see samples derived from it.
- From Parent: Select a sample to show all its child samples.
- Created By: Find samples added by a specific user.
- From/To: Find samples created in a specified date range.

- Click Show Results to see the samples that match your filters.
- Use checkboxes to select the samples of interest, then click Assign Positions, or return for More Filters.
- Once some filters are applied, you'll be able to click Clear all filters to clear them.
- Use Back to Grid to return to the previous set of selected samples.
Assign Positions
Once you've filtered to find the samples you want, use checkboxes to select the ones you will be adding to this storage unit.
- Note: If you select more samples than there are spaces available, you will see an error message telling you to reduce the number of selected samples before proceeding.
Click
Assign Positions.
The selected samples are shown in a numbered position-assignment table on the right. You can directly edit the grid to provide:
- Position:
- In the case of a bag, the numbered position is not meaningful.
- For a cane, it could be numbered from top to bottom (or bottom to top) as your convention dictates.
- For boxes, plates, and tube racks, the Position column shows row/column position numbers corresponding to the layout on the left. By default the samples will be placed in the first available layout positions (using left to right, top to bottom sequencing). You can adjust these default assignments by moving the row in the grid to the row for another available position in the layout.
- Sample ID: the selected samples are listed, but you can add more rows directly. Sample IDs must already exist in the system.
- Amount: Volume
- Units: Units for that volume (mL, mg, etc.)
- Freeze/Thaw Count: The default is zero. If you know the sample has been thawed and frozen before, you can edit this value.
Bag or cane:
 Box, plate, or tube rack:

Add to Storage
Click
Add to [Storage Type] to complete the position assignments.
After assignment is complete, you will see the
Storage View for the location.
- The newly-added samples will be selected in the grid.
- In the case of a box, plate, or tube rack, the cells containing the newly placed samples will also be highlighted.

Start from a Picklist or Grid of Samples
Instead of starting from the Storage, as described above, you can add Samples to storage starting from the sample grid, either while viewing the Sample Type as a whole, or starting from a curated
picklist.
Select Samples to Store
Open the grid of Samples of interest. Either select the
Sample Type from the main menu, or choose
Picklists from the user menu and click the name of the picklist you want. On the grid, identify the Samples you want to store. Only Samples with a
Storage Status of "Not in storage" can be added, so applying this as a filter can be helpful.
Use checkboxes to select the Samples, then select
Storage > Add to storage above the grid. On narrower browsers, this option will be on the
More > menu.

If you are viewing details for an individual sample, you can also click
Add to Storage from the
Storage Location panel.
Find Storage Location(s) for Samples
In the
Assign Samples to Storage popup, you will see storage systems with available storage space. The number of spaces available at each level will help you see easily where there is room for your new samples.
Use the
icons to expand the hierarchy of the storage of your choice, seeing available spaces at each level. When you find the desired terminal storage unit, click
Select.

The
Select button will switch to
Clear, in case you change your mind at this point and want to select another location.
Once you have selected a single storage location with enough space for all selected samples, you can now click
Continue to go to the same interface for assigning locations to your selected samples as if you had
started from the storage system to store them.
- Populate the grid.
- For boxes, plates, and tube racks, the samples will default to the first available slots in the structured layout.
- Move the rows to other grid positions to change where in the unit you will store them.
- Click Add to [Storage Type] to complete the position assignments.
Store Samples in Multiple Locations Simultaneously
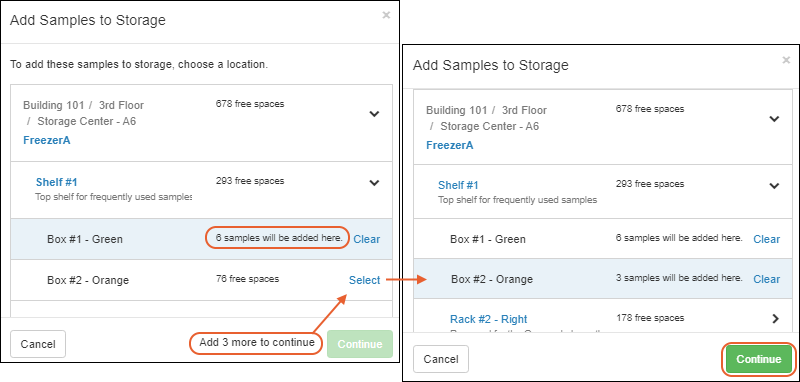
When you're storing more samples than can fit in one terminal storage unit, you'll be able to select multiple storage locations in the "Add Samples to Storage" modal. For example, if you have a rack of many 10x10 boxes and want to continue filling them in sequence with arbitrary numbers of samples to store in each batch, you might have a situation where there are 6 spaces left in a box. Rather than having to first pick 6 samples for that box, then the remaining samples for another box, you can select all your samples and choose multiple locations. You can even choose storage locations across different storage systems if desired.
Samples are added to storage in the order they appear in the grid.
As you
find storage locations for your selected samples, clicking
Select, you'll see a tally of the number of samples you still need to find spaces for before you can click
Continue. The
Select button will change to
Clear once you've clicked it in case you change your mind. In this example, we have 9, so only 3 more for the next box, but you could have hundreds and fill as many boxes as needed.
On the next panel, you can edit the
Stored Amount, Units, and Freeze/Thaw Count for the samples you are storing. You start on the
Edit in Bulk tab; only enable the fields where you want the same value assigned to every sample and provide that value.
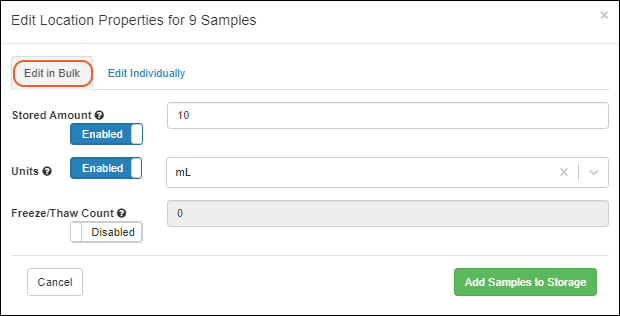
You can also switch to
Edit Individually where you can edit these values in a grid.

When finished, click
Add Samples to Storage. The samples will be added directly to storage in the locations you selected. You will not see the same location assignment interface as when using a single destination storage unit and cannot further adjust positions at this point. After the action, you'll see a banner with the number added and a clickable link letting you
View their storage locations here.

Related Topics