Notebooks give you a place to collaboratively record your research. You can have as many notebooks your team requires. Use custom tags to categorize them by project, team, or any other attribute you choose. This topic covers the process of authoring a notebook, including creating it, adding to it, editing it, and submitting it for review.
Create New Notebook
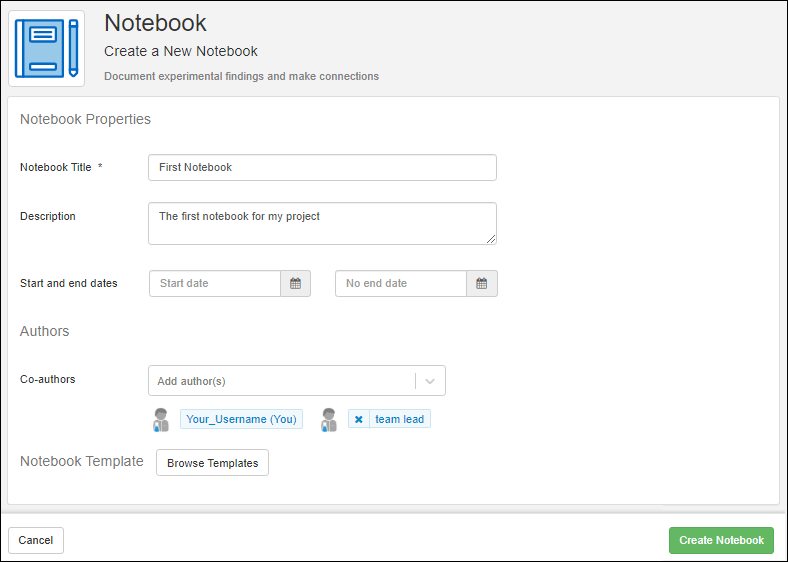
To create a new notebook, click
Create Notebook from the
Notebooks Home dashboard.

- Enter a Notebook Title.
- If you are an administrator, you can click Create new tag to add a new one.
- Enter a Description.
- Select Start and end dates.
- By default, You are an author. Use the selection menu to add more Co-authors.
- If you have templates defined, you can choose one to use by clicking Browse Templates.
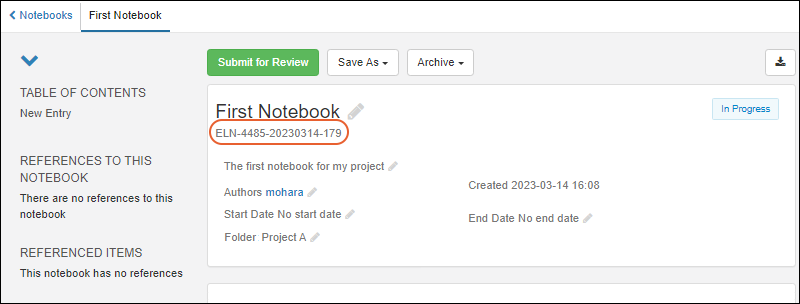
Notebook ID
An ID will be generated for the notebook and shown in the header.
Learn more in this topic:
Notebook ID Generation.
Expand and Collapse Detail Panel
The left panel of the notebook screen displays a
table of contents, full listing of references to this notebook as well as
items this notebook references, and attachments for the notebook and any entries. This section can be collapsed by clicking the
and expanded again by clicking the
.
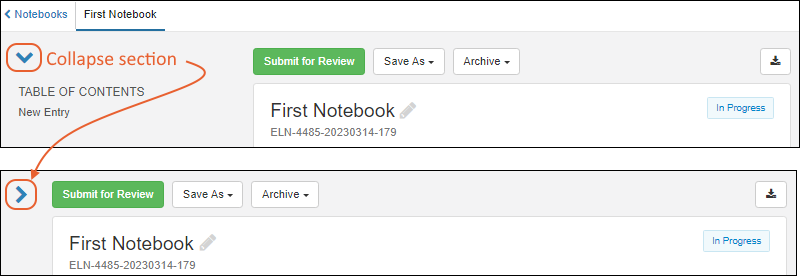
Table of Contents
The
Table of Contents for a notebook lists all the entries, and for each entry, the days and any heading text are listed, indented to make the general structure of the document visible at a glance and easy to navigate.
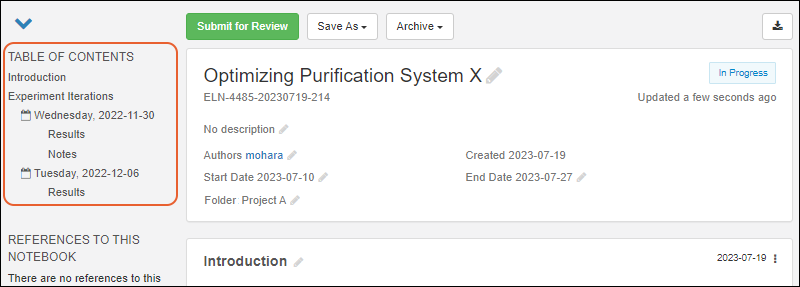
Click any line of the table of contents to jump directly to that section.
Create New Tag (Biologics LIMS Only)
During notebook creation in Biologics LIMS, the author can select an existing tag. If that author is also an administrator, they have the option to
click Create new tag to add a new one.
Learn more about tags in this topic:
Add Custom Fields (Experimental Feature, Biologics LIMS Only)
To define and use custom fields for your Biologics LIMS notebooks to support additional classification that is meaningful to your team, you must first enable the
experimental feature "Notebook Custom Fields".
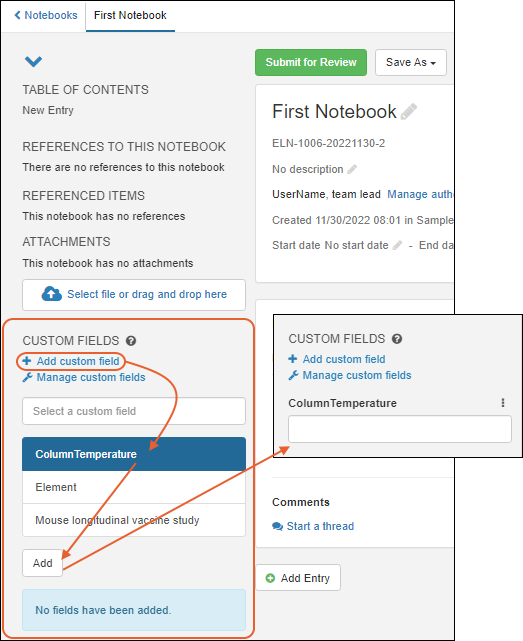
Once enabled, you will see a
Custom Fields section. Use
Add custom field to select an existing field to add to this notebook. Type ahead to narrow the list of existing fields to find the one you want. Shown here, the "ColumnTemperature" field is added and you can now provide a value for this field for this notebook.
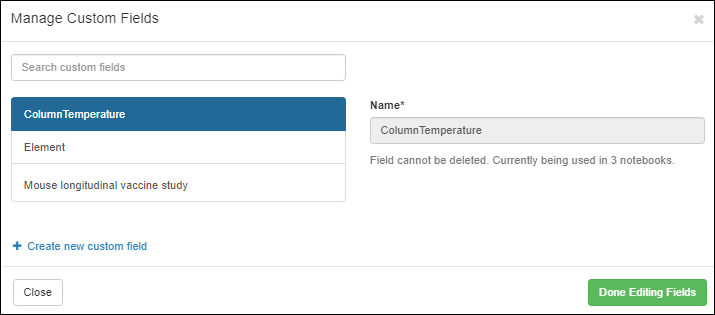
To manage the set of custom fields available in your application, click
Manage custom fields. In the popup you can see the existing defined fields and how many notebooks are currently using them. Here you can also add new fields, and edit or remove any fields not currently in use. Click
Done Editing Fields when finished.
Rename a Notebook
A notebook author can click the
to rename a notebook. Non-authors will not see the edit icon. While the system does not require names to be unique, you will want to choose something that will help your colleagues identify it on lists and dashboards.

Copy a Notebook
Once you have created and populated a notebook, you can copy it to create a new notebook with the same details. This is similar to
creating a new notebook from a template, except that templates do NOT include the value of any custom fields, and copied notebooks do include these values. You do not need to be a notebook author to make a copy of it. Select
Save As > Copy.

Give your new notebook a name, and click
Yes, Copy Notebook to create the new one.
Add to a Notebook
A notebook lets you record your work in a series of
entries, each of which can have a custom name, span multiple days, include
references to data in the application, and support entry-specific comment threads.
The
collapsible detail panel on the left lists the
Table of Contents, references (both to this notebook and from this notebook to other entities), attachments, and includes an edit history timeline. On the right, the header section lists the name and ID, the authors, shows the tag (if any), creation details, and status. A new empty notebook looks like this:
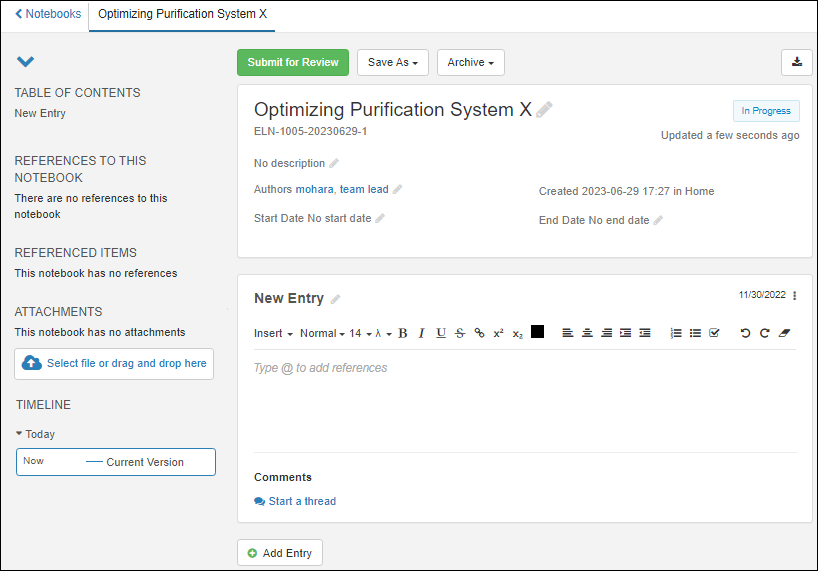
As you complete your notebook, everything is saved automatically. Note that refresh is not continuous, so if you are simultaneously editing with other authors, you may need to refresh your browser to see their work.
Add to an Entry
The
New Entry panel is where you can begin to write your findings and other information to be recorded.
The formatting header bar for an entry includes:

- Insert: Select to add:
- Styling menu: Defaults to Normal and offers 3 heading levels. Heading sections are listed in the Table of Contents for easy reference.
- Font size: Defaults to 14; choose values between 8 and 96 point type.
- Special characters: Add mu, delta, angstrom, degree, lambda, less than or equal, greater than or equal, and plus minus characters.
- Bold, Italics, Underline, Strikethrough
- : Link selected text to the target of your choice.
- / : Make a text selection a super- or sub-script.
- Text color. Click to select.
- Alignment selections: Left, center, or right alignment; indent or dedent.
- : Numbered (ordered) lists
- : Bullet (unordered) lists
- : Checkboxes
- and : Undo and Redo.
- : Clear formatting.
Rename an Entry
Click the
next to the "New Entry" title to rename it.

Add References
Within the entry panel, you can use the
Insert > Reference menu, or within the text, just type '@' to
reference an available resource.
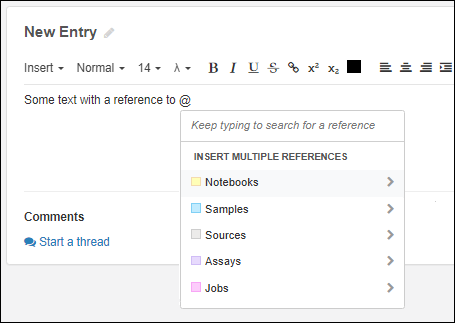
Learn more about adding references in this topic:
Add a New Day
Place the cursor where you want to add a marker for a new date. Select
Insert > New Day. A
date marker will be added to the panel for today's date.

Hover to reveal a
delete icon. Click the day to open a calendar tool, letting you choose a different date. Record activities for that day below the marker.
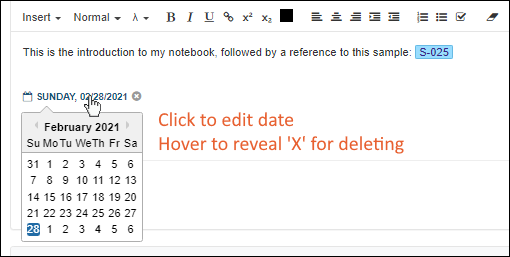
Day markers will be shown in the
Table of Contents listing on the left, with any
Heading text sections for that day listed below them.
Comment on an Entry
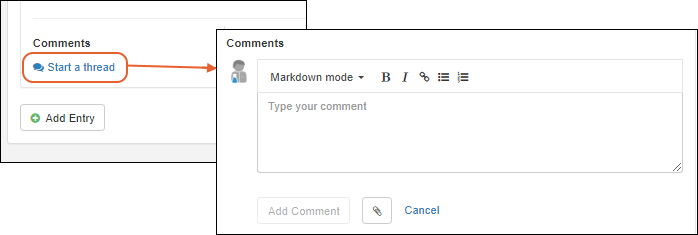
Click
Start a thread to add a comment to any entry. Each entry supports independent comment threads, and an entry may have multiple independent comment threads for different discussions.
By default you will enter comments in
Markdown Mode; you can switch to
Preview mode before saving. Other dashboard options include bold, italic, links, bullets, and numbered lists. Click the
button to attach a file to your comment.
Type and format your comment, then click
Add Comment.
Once your comment has been saved, you or other collaborators can click
Reply to add to the thread. Or
Start a thread to start a new discussion.
For each thread, there is a
menu offering the options:
- Edit comment (including adding or removing files attached to comments)
- Delete thread
Add Attachments
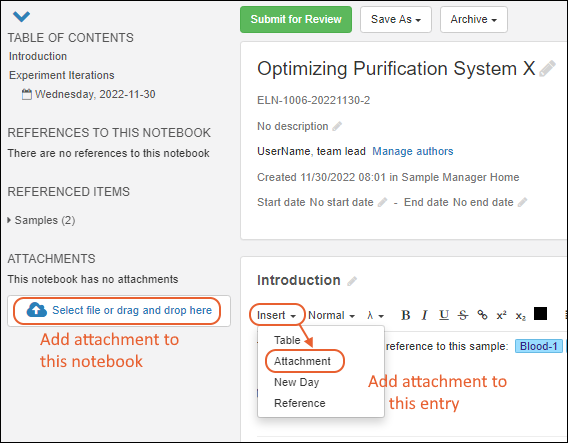
Attachments, such as image files, protocol documents, or other material can be attached to the notebook.
- To add to the notebook as a whole, click the Attachments area in the detail panel on the left (or drag and drop attachments from your desktop).
- To add an attachment to an entry, select Insert > Attachment. You can also paste the image directly into the entry; it will be added as an attachment for you.
Once a notebook has attachments, each will be shown in a selector box with a
menu offering:
- Copy link: Copy a link that can be pasted into another part of an ELN, where it will show the attachment name already linked to the original attachment. You can also paste only the text portion of the link by using CMD + Shift + V on Mac OS, or CTRL + Shift + V on Windows.
- Download
- Remove attachment (available for authors only)
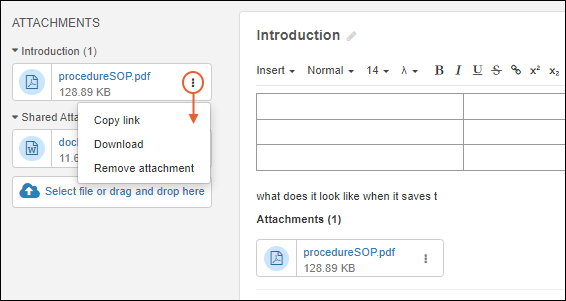
Note that the details panel on the left has sections for attachments on each entry, as well as "Shared Attachments" attached to the notebook as a whole. Each section can be expanded and collapsed using the
/ icons.
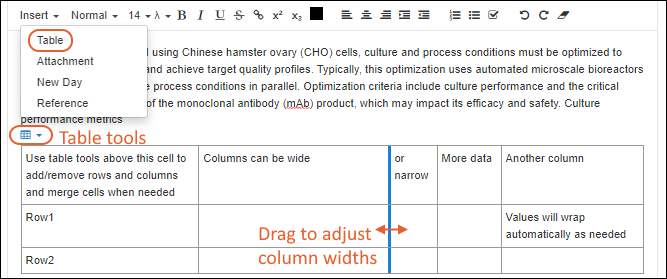
Add a Table
You can add a table directly using the
Insert > Table menu item, directly entering content. You can also paste directly from either Google Sheets or Excel either into that table, or into a plain text area and a table will be added for you.
Adjust Wide Tables
After
adding a table to an ELN, you can use the
table tools menu to add/remove columns and rows and merge/unmerge cells. Drag column borders to adjust widths for display.
When configured, you'll be able to
export to PDF and adjust page layout settings to properly show wider tables.
Edit an Entry
Entry Locking and Protection
Many users can simultaneously collaborate on creating notebooks. Individual notebook entries are locked while any user is editing, so that another user will not be able to overwrite their work and will also not lose work of their own.
While you are editing an entry, you will periodically see that it is being saved in the header:

Other users looking at the same entry at the same time will be prevented from editing, and see your updates 'live' in the browser. A lock icon and the username of who is editing are shown in the grayed header while the entry is locked.

Edit History
The edit history of the notebook can be seen at the bottom of the
expanded detail panel on the left. Versions are saved to the database during editing at 15 minute intervals. The last editor in that time span will be recorded. Past versions can be retrieved for viewing by clicking the link, shown with the date, time, and author of that version.
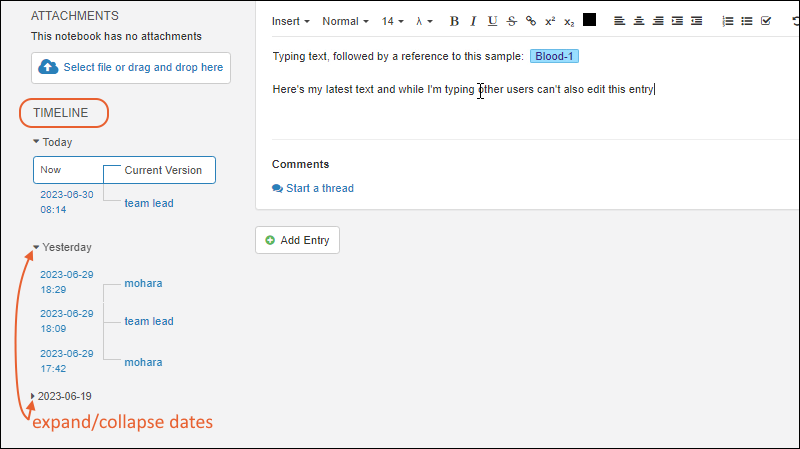
Expand sections for dates by clicking the
and collapse with the
.
Once a notebook has been submitted for review, the
Timeline section will include a
Review History tab, and the
Edit History tab will be labeled, containing the same information.

Manage Entries
Your notebook can contain as many entries as needed to document your work. To add additional panels, click
Add Entry at the bottom of the current notebook. You can also add a new entry by copying an existing entry.
Use the
menu to:
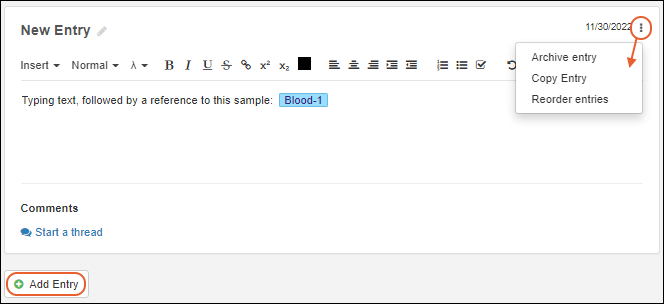
Archive Entry
You cannot completely delete an entry in a notebook. Archiving an entry collapses and hides the entry.
- You can immediately Undo this action if desired.
- Note that when an entry is archived, any references in it will still be protected from deletion. If you don't want these references to be 'locked' in this way, delete them from the entry prior to archiving. You could choose to retain a plain text description of what references were deleted before archiving, just in case you might want to 'unarchive' the entry.
Once multiple entries have been archived, you can display them all again by selecting
Archive > View Archived Entries at the top of the notebook. Each archived entry will have an option to
Restore entry.
Return to the active entries using
Archive > View Active Entries.
Copy Entry
Create a duplicate of the current entry, including all contents. It will be placed immediately following the entry you copied, and have the same name with "(Copy)" appended. You can change both the name and
position.
Reorder Entries
Select to open a panel where you can drag and drop to rearrange the entries. Click
Save to apply the changes.
Archive Notebook
You cannot delete a notebook (just as you cannot fully
delete a notebook entry, but you can
Archive it so that it no longer appears active. Archived notebooks will be locked for editing, removed from your list of recently accessed notebooks, and will no longer show in your active notebooks. They can be restored at a later time.
To archive a notebook, select
Archive > Archive Notebook from the top of the notebook editing page.

Access Archived Notebooks
From the
Notebook Dashboard, select
Manage > Archive. You'll see a grid of archived notebooks making it easier to restore them or otherwise access their contents.

To
Restore (i.e. undo the archiving of) a notebook, open it from the
archived Notebooks list and click
Restore.
Submit for Review
Learn about the review process in this topic:
Related Topics