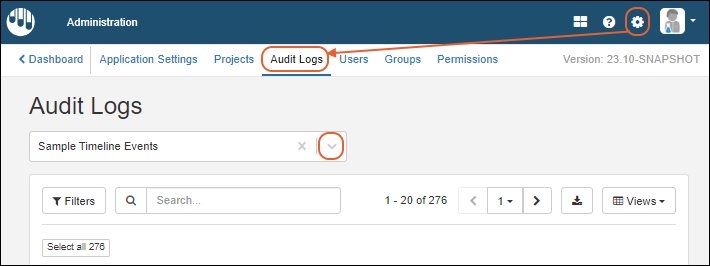
Administrators can view the audit history from numerous places within the application, including from
> Audit Logs. Customized grids can present audit information in the way most useful to them.
View Audit History
Select
> Audit Logs.

The audit log provides access to numerous audits of system activity, defaulting to
Sample Timeline Events.
You can also access audit histories from many places in the application by selecting
Manage > View Audit History. It will open on the log most relevant to where you were in the application when you opened it. This image shows
Roles and Assignment Events, the default for the
Permissions tab.

Available Audit Logs
Use the selection menu near the top of the page to see a full listing of other logs available to administrators, including:
- Assay Events: Run import, deletion, and reimport.
- Comments entered when assay data is deleted will be shown in the User Comment column.
- Note that for reimport, two assay events are created: one for the 'old' run being replaced and one for the 'new' run representing the new import.
- Attachment Events
- Data Update Events: When a row is updated, the log will show the details of what changed in that row.
- Domain Events: Tracks changes to columns in definitions (domains) of sample types, sources, and assays.
- Domain Property Events: Changes to the properties of a column in a domain.
- List Events
- Notebook Events
- Notebook Review Events
- Project Events: Project editing events, including selective data exclusion for projects.
- Query Update Events
- Roles and Assignment Events
- Sample Timeline Events: Records events for all samples.
- Individual sample timelines show all events for each sample.
- Detailed events for merge updates to sample data will show only the fields that were updated.
- Sample registration, update, storage changes, and check in/out actions are all logged.
- Comments entered when Samples are deleted will be shown in the User Comment column.
- Sample Type Events: Creation and modification of Sample Types.
- Sample Workflow Events: Job and task completion are recorded.
- Sources Events: Including creation of Source Types and registration of Sources.
- Comments entered when Sources are deleted will be shown in the User Comment column.
- Storage Management Events: See View Storage Activity.
- User Events: Creation of users; logging in and out.
Note that during folder import, data categories will be imported in "chunks" in a certain order. So, for example, all inventory data will be in one chunk and all job/task data in another chunk. Using folder import to load data into Sample Manager may result in sample timelines that do not represent actual usage for individual samples.
Customize Audit Views
Use the
grid view customizer to change the columns shown, labels, and order, as well as apply filters and sorts to give you the specific view of each type of audit log that you need. You can either save as a personal named view, share the view with other administrators, or change the default view all administrators will see.
Learn more in this topic:
Require Users Provide Reasons for Certain Actions (Professional Feature)
The following actions allow users to enter a reason (aka a "comment") for the action, which will be recorded in the audit log:
- Editing samples individually from a sample details page, in a grid, in bulk, or via update from file
- Editing sources individually from a source details page, in a grid, in bulk, or via update from file
- Editing lineage
- Editing assay run or result data in a grid, in bulk, or via re-import
- Deleting samples and sample types
- Deleting sources and source types
- Deleting assay runs and assay designs
- Deleting jobs
- Deleting storage
- Updating sample amount or freeze/thaw count from a sample details page or on the sample details panel from the storage view
- Checking samples in or out of storage
- Discarding samples from storage
- Moving data between projects
- Recalling a notebook submitted for review
By default, reasons are optional, but they can be configured to be required on an application-wide basis by an administrator.
- Select > Application Settings.
- Scroll down to the Audit Logging section.
- Select Yes, reasons are required.

Users will now see the fields for reasons for the above actions as required and must enter a reason to complete the action.
Related Topics