Assay Designs describe the structure of assay data you will gather for your samples. Similar to sample types, you define the properties and fields of your experiment data. Assay data will also be mapped to the sample that it is about. In this topic, we define a "Tutorial Assay" and import an example run of data for the
"Tutorial Samples" we created in the previous step.
Create Assay Design
- From the main menu, select Assays > Create an assay design.
- If any assay designs have already been created, you will not see this link. In that case, click Assays and then Create Assay Design.

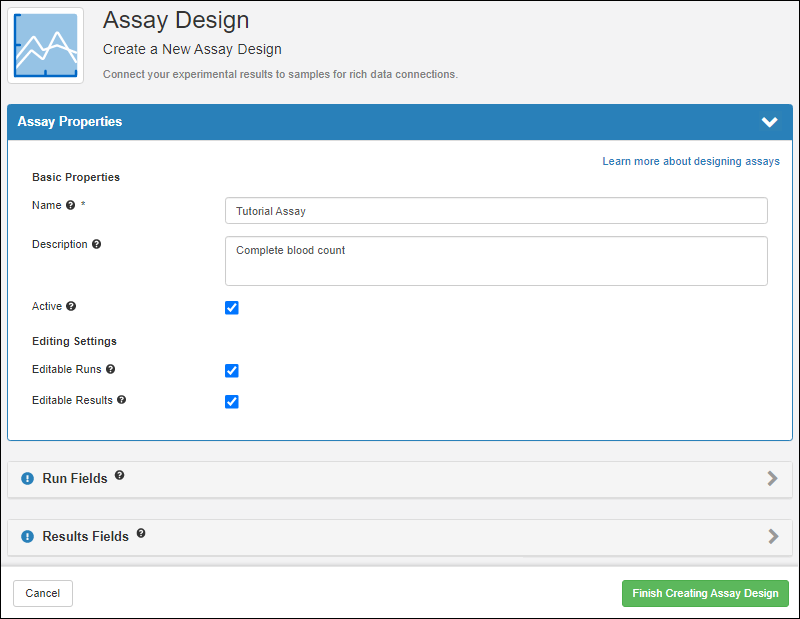
Define Assay Properties
Assay properties are elements that apply to all runs that use this assay design, i.e. one value is set for all runs.
- Enter:
- Name: Tutorial Assay
- Description: Complete blood count
- Active: Leave this box checked; unchecking it will archive the assay design.
- Check both boxes for Editable Runs and Editable Results to give you the most options to explore with this tutorial assay design.

Add Run Fields
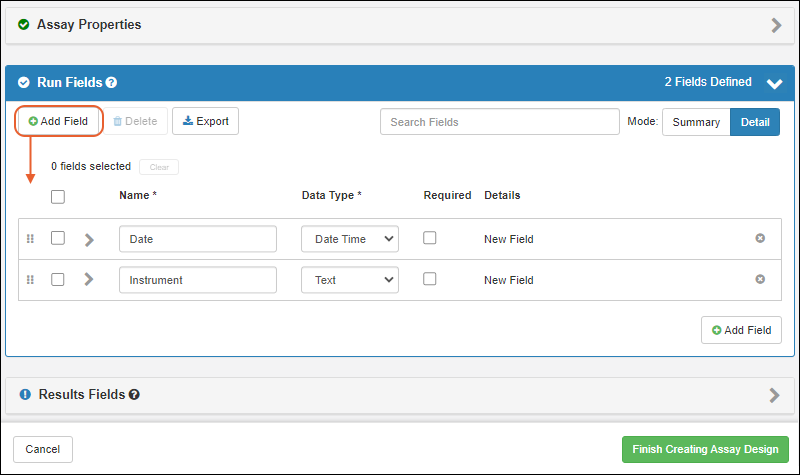
Assay run fields are set once for each run that uses this assay design, i.e. one value is set for each run.
- Click the Run Fields section to open it.
- Click Manually Define Fields.
- Click Add Field to add each of the fields shown below and select the Data Type shown:
- "Date" of type "Date Time"
- "Instrument" of type "Text"

Add Results Fields
You could also manually add results fields, which will be different for each row of data within a given run, but in this tutorial, we will infer them from an example spreadsheet.
In the assay designer:
- Click the Results Fields section to open it.
- Drag and drop the "TutorialAssay_Run1.xlsx" into the target area.
- The results fields will be inferred from your upload and shown in the panel. You could make adjustments if needed, but for this tutorial just accept all defaults.
- Notice that the SampleID field from the example spreadsheet has been inferred to be of type "Sample" automatically. All assay results must map to samples, so if the system could not infer which field contained that mapping, you would have had to assign it yourself.
- By default samples of any sample type (i.e. "All Samples") could be uploaded for this assay. If needed you could constrain the lookup to a specific sample type for this specific assay design.
- For this tutorial accept the defaults.

- Click Finish Creating Assay Design.
Now that your assay design has been created, you can use it to import the data from the same example spreadsheet.
Import Assay Data
The "TutorialAssay_Run1.xlsx" spreadsheet you already downloaded contains some "Tutorial Assay" data for some of the samples we created in the
previous tutorial step.
You can confirm that the expected set of samples already exists by selecting
Menu > Tutorial Samples and seeing that "Tutorial-003 through Tutorial-012" already exist. (Hint: Sort by Sample ID or use the
to see the second page of samples.)
- If you navigated away to check samples, reopen your Assay Design page by selecting Tutorial Assay from the main menu.

- Click Import Data.
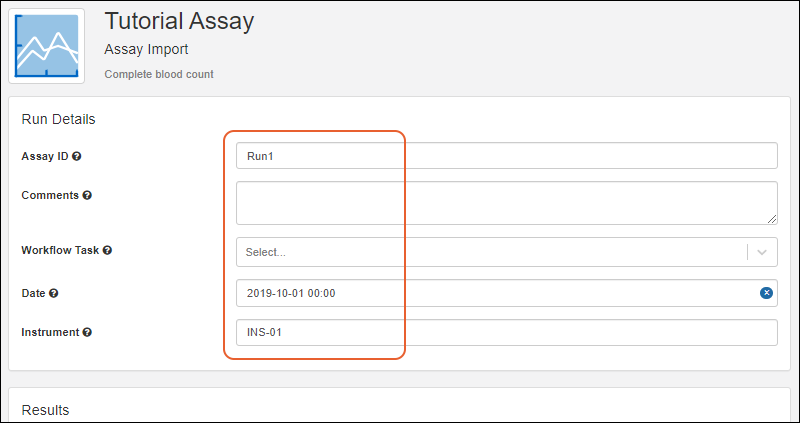
- Enter Run Details:
- Assay Id: Enter "Run1". If you leave this blank, a run name will be generated for you based on the assay design name and current day and time.
- Comments are optional.
- Workflow Task would let you link this run to a specific workflow task. Leave this blank for the tutorial.
- Date: Enter "2019-10-01" or click the field to use the day/time date picker.
- Instrument: Enter "INS-01"

Upload Results from File
- In the Results panel, the Import Data from File tab will be preselected.
- Drag and drop the "TutorialAssay_Run1.xlsx" file into the target area.
- You will see the first three rows of the data file in the preview section.

You will see the grid of results. As for other grids, you can
filter, search, and sort the result data.

Other Ways to Enter Results
The other tabs in the
Import Data interface allow you to copy and paste data from a spreadsheet or enter values directly in a grid, individually or in bulk. Learn more in this topic:
Related Topics