This topic covers the creation of
Source Types that describe the kinds of entities from which your samples are derived or other logical "sources" of samples. It also covers import of data to these types, i.e. creation of the individual
Sources.
Creating and populating Source Types is very similar to the process used for
sample types and samples, with the exception that sources do not have the option to include parent sources. If you would like a tutorial walkthrough of this process, complete the last step of the
Tutorial.
Create Source Type
Describe the type of source. Within the system, you might have several different types of source from which samples are taken, such as
biological sources like animals or cell lines and
physical sources like labs or vendors.
From the main menu, select
Source Types and click
Create Source Type. When you create your first Source Type, there is a shortcut to
Create a source type on the main menu. Note that you can only create Source Types in the home (top-level) project. If the creation button is missing, navigate first to the
home project.

- Enter a Name (Required) for this Source Type, shown here 'Creature'. You can edit the Source Type to change this name later; the SourceIDs/Names of existing sources will not change.
- Enter an optional Description.
- Like with samples, all individual sources must have a unique name. You can either:
- Provide these with your data in a column named "SourceId" or
- Ask the system to generate them using a Naming Pattern.
- The default pattern is the word 'Source' followed by an incrementing number:
- Either accept this default, specify another pattern, or delete it (and ignore the placeholder text) if you plan to supply source names.
- If you want to include lineage relationships (parent sources) for this type of source, and want to be able to import them from spreadsheets, click Add Parent Source Alias

- As for sample types, click the Fields section to open it.
- Every Source Type includes Default System Fields "SourceId" (Name) and "Description". You can use the checkbox to disable the description, but the name/sourceID is always required. In addition, fields like "Created/CreatedBy", and "Modified/ModifiedBy" are always included but not shown here. Find a list of reserved and internal field names in this topic: Data Import Guidelines
- For defining Custom Fields, you can Import or infer fields from file or manually define fields yourself. Details are found in the topic for creating fields in sample types.
- If you infer from a file that contains the built-in fields, they will not be shown as they will always be created for you.
- Note that you can create fields of the same data types as you can for sample types and assays, with the exception that you do not include fields of type "Sample". Associations of samples with sources are made from the sample definition to it's source, not the other way around.

- Click Finish Creating Source Type when finished.
Source Naming Patterns
When you create a Source Type, you decide how unique names for all the sources will be generated. You can provide them yourself or have them automatically generated with a
naming pattern, similar to how samples are named.
The default pattern is the word 'Source' followed by an incrementing number:
You can change the string in this default pattern to disambiguate the sources and make their types more clear to users; for example, a 'Creatures' source could use the pattern "Creature-${genId}" and have names like "Creature-1, Creature-2, etc."
Add Parent Source Alias
Sources may have parent sources of the same or other types. For example, you might have source types for both "Studies" and "Subjects", in which all "Subjects" have a parent "Study". Just as how
parent aliases can be defined for Sample Types, you can include a Parent Source Alias for your Source Type, giving you a column name to include when uploading parents of the selected source type.

Shown above, if your "Subjects" spreadsheet includes a column named "ParentStudy", you can use it to provide the source ID for the study source of each subject.
Add Sources
Once you have created the
Source Type, populate it with the individual sources. This process is very similar to the process of
creating samples.
Note that fields of type
Attachment are not included in any grid or file import methods. Values must be individually added for each Source as described in this topic:
Attach Images and Other Files.
Start from the desired Source Type by clicking it's name on the main menu or
Source Types page. You may want to
obtain the Template to assist you in formatting your data. Use the
Add menu, or you can also use the
Add Sources menu on the
Source Types page to open either import option, in which case you will first select the desired Source Type. Select either:
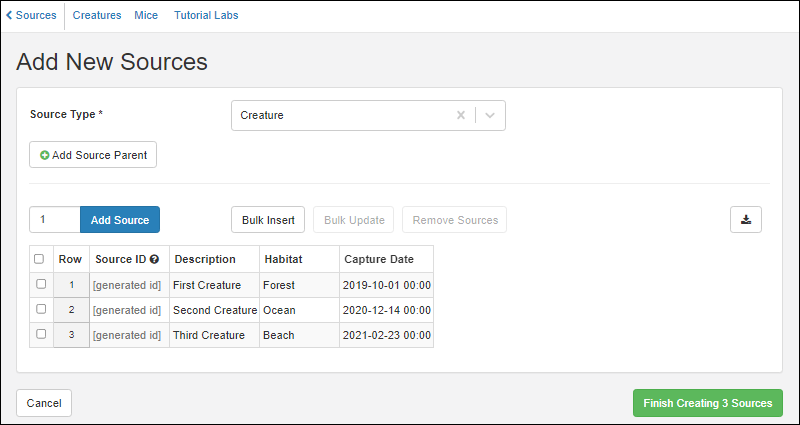
Shown here we add 3 source 'creatures' directly in a grid. Notice that you could add a column for providing a source parent by using the
Add Source Parent button. If there are any source aliases, source parent columns will be provided by default.

Click
Finish Creating # Sources when ready (the number will appear on the button).
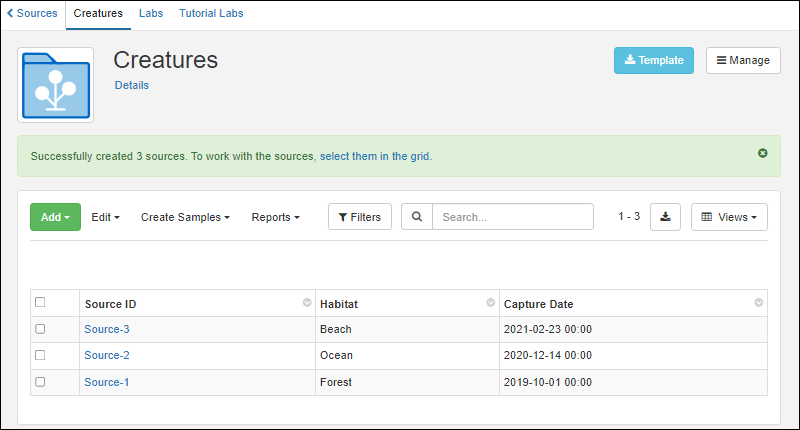
You will see a banner message with the number of new sources created and the option to click to
select them in the grid.

These sources are now available for associating with samples.
Update or Merge Sources from File
Using the
Add > Import from File option will only create new sources. If there is data for any existing Source IDs, the import will fail.
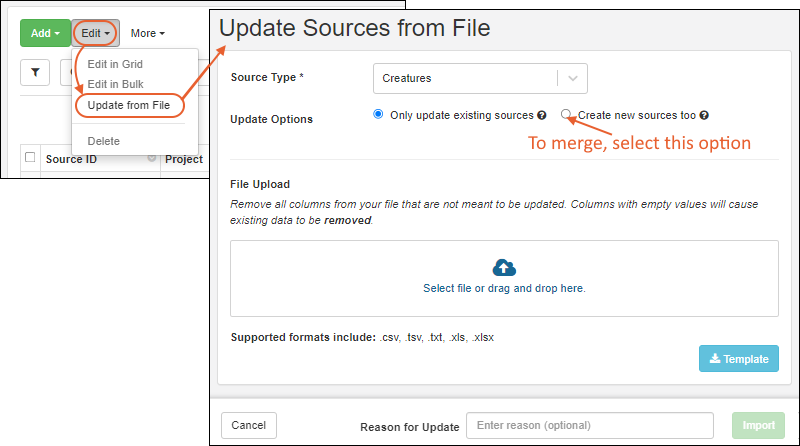
To update existing sources, or import a spreadsheet merging existing sources and adding new ones, use
Edit > Update from File.

The
Update Options selection can be either:
- Only update existing sources: (Default) Update only. Any new sources will cause the import to fail.
- Create new sources too: Merge. Both existing and new sources can be included.
Only the fields that are changing in the existing Source IDs should be included in the upload. If you provide any column in the file with empty values, it will cause any existing data in those fields to be
removed.
Users can provide a
Reason for Update if desired
or required before clicking
Import.
Related Topics