This topic covers the management of samples and types of samples within the Sample Manager application.
View All Sample Types
To view all the Sample Types defined in LabKey Sample Manager, click
Sample Types on the main menu.

The Sample Types dashboard lets you:
The grid of all Sample Types below lists the name, description, and other details about each type of sample in the system. You can also download a template for easier import of data from files.

Click the name to
open the set of individual samples of that type.
View Samples of One Type
You can open the grid of all samples of a specific type in several ways:
- Click the type name in the Sample Types grid.
- Click the graph bar for that Sample Type on the main dashboard.
- Click the sample name directly from the top level menu from anywhere in the application.

Sample Type
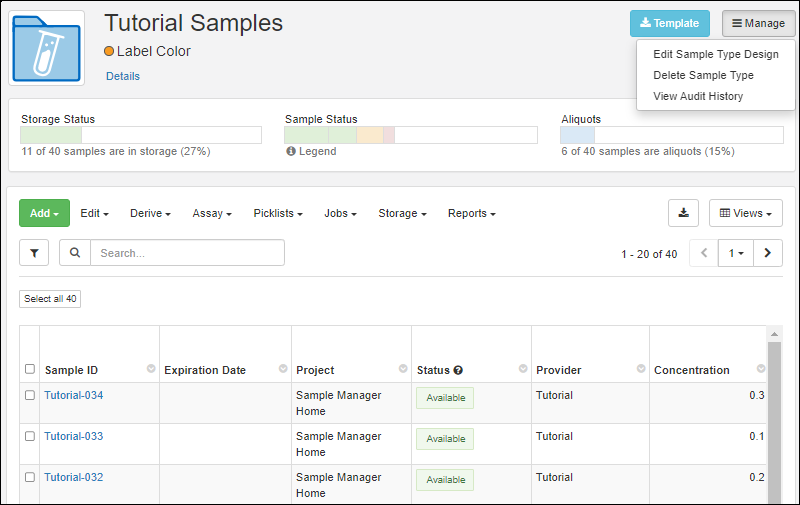
insights are available in a horizontal panel and the
Manage menu offers various actions.
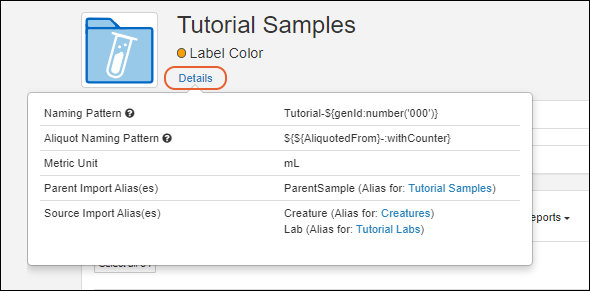
Hover over the
Details link to see the
Description, Naming Pattern, Metric Unit, Parent Import Alias(es), and Source Import Alias(es) for this Sample Type.
Below the insights panel, the grid of
Samples offers menus, custom views, filtering, sorting and searching. Learn more in this topic:
Sample Type Insights
The panel above the grid gives a quick visual summary of
Storage Status,
Sample Status, and
Aliquots. Color coded bars show the relative prevalence of each state. Hover for details about any colored segment. Click any bar segment to filter the samples grid to show only those samples.

When several
Sample Status values have the same base type, such as "Received" and "Available" both being "Available" (green shaded) samples, you can hover over portions of the bar for details of that specific sample status. Click any bar segment to filter the samples grid to show only those samples.

Manage Menu
The
Manage menu in the upper right offers these options:
- Edit Sample Type Design: Reopen the existing details and fields; edit using the same interface as you used to create the Sample Type.
- Delete Sample Type: Note this will delete all sample data and dependencies as well. Deletion cannot be undone. The administrator deleting a Sample Type can provide a Reason for Deleting if required or desired, and must confirm the action.
- View Audit History: Administrators can view the audit history for this Sample Type from this link.
Learn more about sample grid menus and buttons in this topic:
View Individual Sample Details
Click the Sample ID for any sample to view the details about it in the system in a series of panels.
Tabs along the top offer more details about the sample. From the
Manage menu you can create new samples of any type,
delete this sample,
add it to a picklist, or upload assay data for this sample. Storage editors can
add to storage, check it out, or discard it. You can also view the audit history for this specific sample.
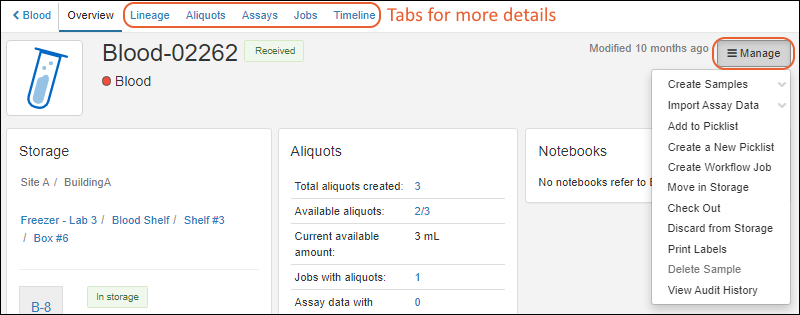
The tabs along the top of the details page let you see the following for this specific sample:
- Lineage: View a lineage graph or grid.
- Aliquots: See aliquots and subaliquots of this sample.
- Assays: All assay data available for this sample (and any aliquots).
- Jobs: Find all jobs involving this sample (and any aliquots).
- Timeline: See a detailed timeline of all events involving this sample.
Panels on the Overview Tab
Panels on the
Overview tab include:
- Storage: This panel shows the amount of the sample (if provided). If the Sample is already in storage, it also shows the current location and checkout status, if any. Otherwise, you'll see a link to add the sample to storage
- Aliquots: Details about any aliquots created of this sample. Note that to be "available" in this panel, an aliquot must have a Stored Amount > 0.
- Notebooks: Links to any notebooks that reference this sample will be shown here. Click the name to open the notebook
- Details: Details about this sample.
- For an aliquot, you will see both Aliquot Details and Original Sample Details in separate panels.
- Source Details: Information about sources of this sample. Note that only one generation is shown; see the lineage tab for more.
- Parent Details: Information about parents of this sample. Note that only one generation is shown; see the lineage tab for more.

Edit Sample Details
To edit the details for this sample, click the
(Edit) icon for that section. Make changes using dropdowns and selectors similar to when you originally assigned the values.
Note that you can edit the SampleID (Name) here, keeping in mind that all Sample IDs must remain unique. This is useful in a situation where the original name may have included a typo or other error. You cannot, however, edit SampleIDs using any bulk method, including 'Edit in Grid' and import from a file.
You can provide a
Reason for Update if desired
or required before clicking
Save.
Edit Sample Lineage
You can edit the immediate source and parent information (i.e. the first generation of lineage) directly from the sample details page. Use the
(Edit) icon for the
Source Details or Parent Details section as needed. Make changes using dropdowns and selectors similar to when you originally assigned the values.
You can provide a
Reason for Update if desired
or required before clicking
Save.
More Sample Editing
Learn more about editing samples in this topic:
Delete Samples
Deletion of samples may be necessary for a variety of reasons, and once completed, deletion cannot be undone.
Deletion Prevention
For samples with data dependencies or references, deletion is disallowed. This ensures integrity of your data in that the origins of the data will be retained for future reference. Samples cannot be deleted if they:
- Are 'parents' of other derived samples or aliquots
- Have assay runs associated with them
- Are included in workflow jobs
- Have a status that prevents deletion
- Are referenced by Electronic Lab Notebooks
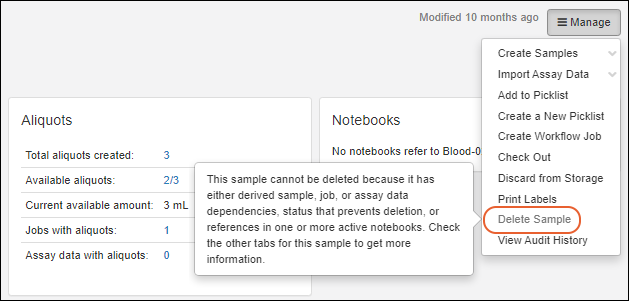
The
Delete Sample option will be grayed out when deletion is disallowed.
Delete One Sample
For samples which
can be deleted, you can delete a single sample while viewing it's details page.
- From the detail page for the sample to delete, select Manage > Delete Sample.
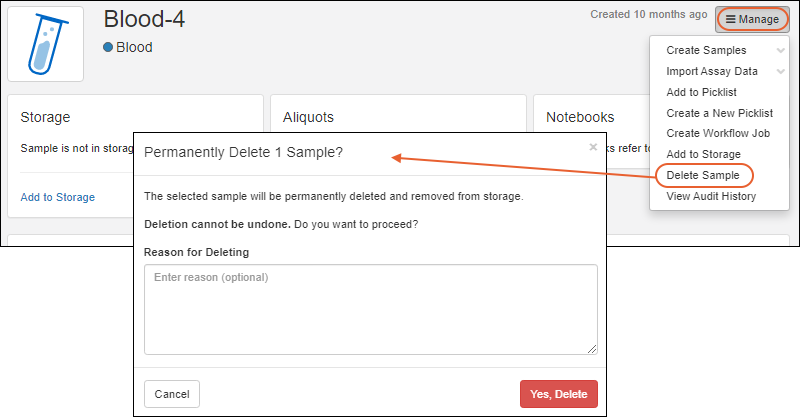
- In the popup, you can enter the Reason for Deleting if required or desired.
- Confirm the deletion by clicking Yes, Delete.
Delete More Samples
You can also delete one or more samples from the grid view for the Sample Type. Note that you can only delete up to 10,000 samples at one time, so if you need to delete more than that, perform the deletion in batches.
- From the grid view for the type of sample to delete, select one or more checkboxes for the sample(s) you wish to delete. To select all samples, use the checkbox at the top of the column.
- Select Edit > Delete.

- In the popup, you can enter Reason for Deleting if required or desired.
- Confirm the deletion by clicking Yes, Delete.
Partial Deletion
If deletion is disallowed for any of the samples you attempt to delete, the popup will give you more details and ask you to confirm or cancel the partial deletion of any samples without dependencies.
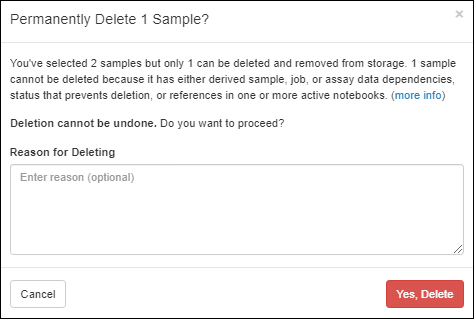
When you delete samples, they will be automatically removed from any picklists to which they had been added.
Move Samples (Premium Feature)
When using the Professional Edition of Sample Manager (or any edition of LabKey Biologics LIMS), users with the appropriate permissions will be able to move eligible samples between Projects.
Learn more in this topic:
Note that some Sample Statuses, including "Locked", prevent samples from being moved.
Related Topics
 The Sample Types dashboard lets you: