Events that happen to individual samples are available on the
Sample Timeline. You can view them in a graphical format which records the full history for an individual sample in your system.
The sample timeline can play an important role in tracking chain of custody for samples and complying with good laboratory practices. A sample timeline can help you answer questions like:
- Where is my sample located right now?
- Who has it now and when did they take possession of it?
- What has been done to my sample before I received it?
While the
main audit log tracks all events occuring in the system, the sample timeline is useful for isolating events of different types happening to a single sample.
View Sample Timeline
To see the sample timeline, click the name of the sample in any grid where it is listed. You can find it on the grid for the Sample Type, access it from any assay data uploaded for it, or find it listed for a workflow job.
Click the
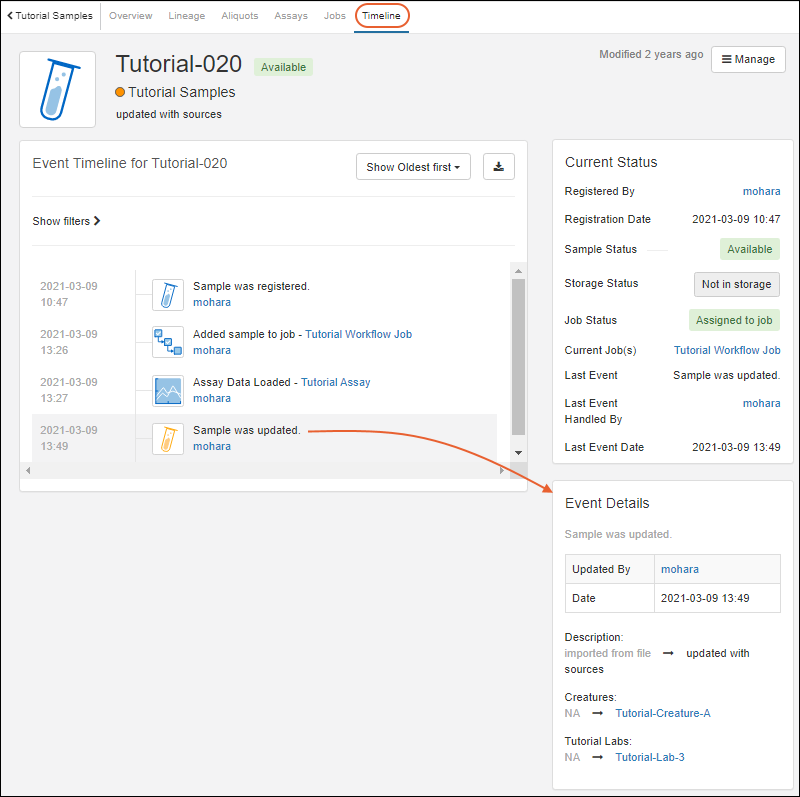
Timeline tab along the top row. You will see all events for that specific sample.

Shown here, a sample was created (registered), it was added to a job, assay data was loaded for it, and then it was updated. The update
Event Details show that there were changes to two Sources for the sample.
Current Status
The
Current Status section in the upper right includes summary details like where the sample is now, who was the last to handle it (and when) and active status values.
Sample status, storage status, and job status of samples are highlighted with color coded indicators:
Event Details
Click any event on the timeline to see the
Event Details in a panel on the lower right. For example, when the event is "Sample was updated," the details section will say when and by whom.
Listing Order
By default, the timeline will
Show Oldest first. Use the dropdown at the top to switch to
Recent first instead.

Filter Timeline
When the list of timeline events is long, it can be helpful to filter for events of interest. Click
Show filters above the listing to open the filters panel (the link will now read "Hide filters").

Use checkboxes to filter events to show any combination of:
- Sample Events
- Assay Events
- Job Events
- Storage Events
Use the dropdown to filter by user, and date selectors to show a portion of the timeline for a range of dates of interest. Click
Apply to apply filters and
Clear to clear existing ones.
Export Timeline
Click the
(Export) button to download the timeline as an Excel file. The exported file will include:
- Date
- Type of event
- Event name
- User
- Old Event Details
- New Event Details

Related Topics