All users can now create their own customized grid views for optimal viewing of the data that they care about. Administrators can set default views for everyone, any user can create and save their own views most pertinent to them, and decide whether to share those named custom views with other users.
Customize Grid View
Quickly see data that pertains to you with custom saved grid views. Create a custom view of your data by rearranging, hiding or showing columns, adding filters or sorting data. With saved custom views, you can view your data in multiple ways depending on what’s useful to you.
You can quickly customize a grid view directly from the
column header menus, or open the grid view customizer by selecting
Grid Views > Customize Grid View to make many changes at once.
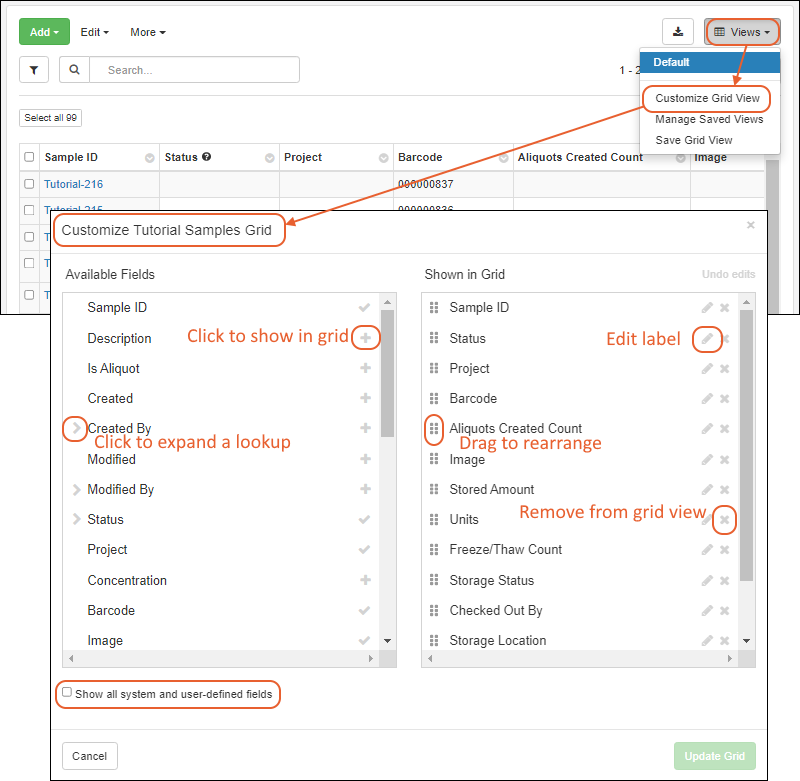
The
Available Fields panel is on the left; fields
Shown in Grid are listed in left to right order in the panel on the right. Check
Show all system and user-defined fields to expose additional fields that are hidden by default. Expand "lookup" nodes to find more columns by clicking the
. Details about changes you can make are below. You can revert changes any time by clicking
Undo edits.
Click
Update Grid to apply your changes to the visible grid.
Once you've changed the grid, either using the column headers or the grid customizer, you will see options to save the changes as a new named grid view you can access directly later. Learn about saving the grid
below.
Change Column Order
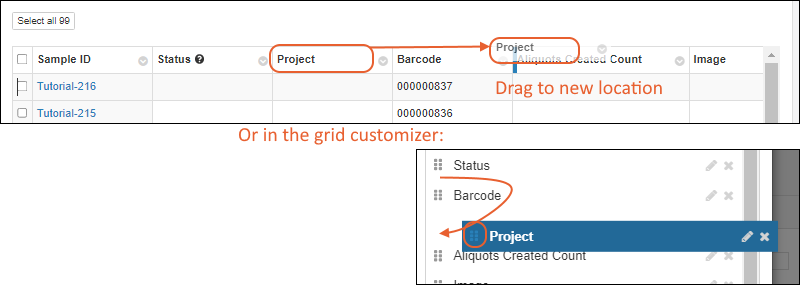
Drag and drop column headers directly in the grid view, or open
Views > Customize Grid View and using the
sixblock handles to change the column order in the
Shown in Grid panel.
Insert Column
Select
Insert Column from any column header, or open
Views > Customize Grid View. Click the
in the
Available Fields panel to add a new column to the grid.
Drag and drop the columns to the desired order.
Hide Column
Select
Hide Column from any column header to hide that column, or open
Views > Customize Grid View and click one or more 'X's for fields you want to delete (from the
Shown in grid panel.
Edit Label
Edit the display label for a column. You can either select
Edit Label from the column header and type the new label directly:
Or click the
for the field within the view customizer and type the new label.

Include Sorts and Filters in Custom Views
When you
save a grid view, any filters or sorts currently applied will be saved. Make the filtering and sorting adjustments you prefer prior to saving.
Include Ancestor Information
To include information about ancestors, use the
Ancestor node in the grid view customizer to find specific types and properties of sample ancestors. Learn more in this topic:
Save Grid View
Once you've made changes, either directly using column headers or using the grid view customizer, you'll see a header banner on your grid view indicating that it has been editing and inviting you to:
- Undo: revert to the default.
- Save your changes.

- Enter a Grid View Name in the box.
- If you have the Editor role (or higher) you can share your grid with other users. Check the box to Make this grid view available to all users. Otherwise your named grid views will be visible only to you.
- Select whether to Make this grid view available in all Projects, i.e. in child folders.
- Click Save again.
See below for
additional options available to administrators.
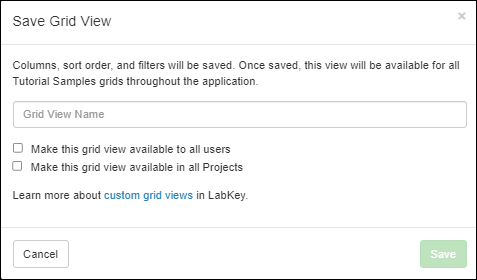
Columns, sort order, and filters will be saved. You cannot use the names 'Default', 'Your Default', or 'My Default' to avoid confusion later with an administrator-settable default grid.
You'll now see your named grid on the
Views menu for all grids of this type throughout the application. Learn more
below.
Administrator Options for Saving Grid Views
For administrators, the options available are:
- Save as default view for all users: Only available to administrators and their default.
- Save as a custom view: As for any user, select this option to save a named custom grid view. When selected, you'll see the same options to give the grid a name, and select whether to share with other users and/or make it available in all Projects.
- Click Save.
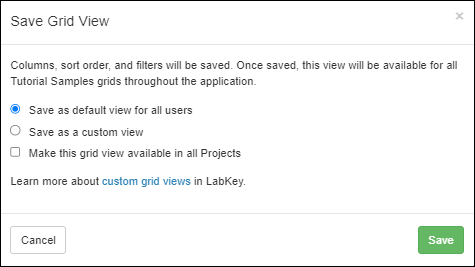
Note that it is possible to save a default view with a filter applied that may cause some samples to not be shown by default. They can still be found by users based on their data (such as by using the Sample Finder) but a customized filtered grid view may not show them automatically.
In addition, the "Edit in Grid" option uses the default view to present the samples to a user for editing, so if they select samples that are "filtered out" by a custom default view, those samples may be omitted from the edit grid.
To avoid these scenarios, administrators should use caution when saving filtered grid views as the default.
Use Saved Views
By saving a set of customized named views, you can create your own menu giving you quick access to whatever standardized groupings and details are relevant to your specific role. You might have different views filtering samples by attributes or storage location, and another showing only the shipping details needed for sets of samples.
In addition to
Your Saved Views, you'll see
Shared Saved Views that were created by other users listed separately.
Access both types of saved grids from the
Views menu:
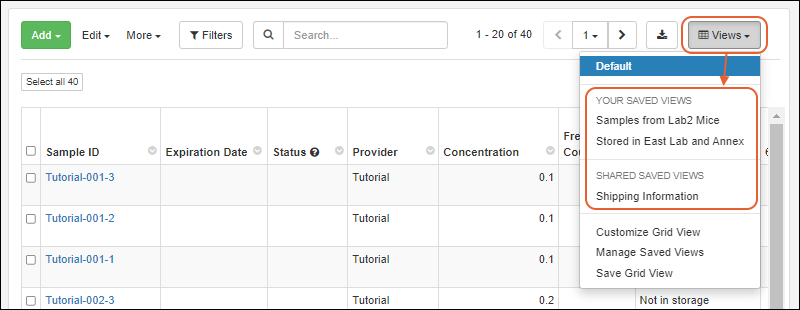
From a customized grid view, you can more easily create standardized reports about the samples in the system and export for downstream analysis or further processing. When you select a custom grid view, it will still be shown the next time you return to that grid.
Edit Saved Views
To edit a saved view, you simply select it from the menu, then make changes you want. The name of the grid you are viewing is shown in the header, and once you've made changes you'll see an "Edited" indicator and
Undo and Save buttons. Editing a named view, you can also use the
> Save as... option to save as a new grid view.

Manage Saved Views
Select
Views > Manage Saved Views for a popup listing them. You can:
- (Edit)
- (Delete)
- Administrators will be also see options to:
- Revert an edited Default view to the system default.
- Make default: Make an existing named view the Default view for all users.

Related Topics
