An administrator or storage designer may edit both the properties and the composition of storage units within a given storage system like a freezer.
Open Storage Editing
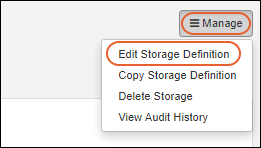
You can edit a storage definition by first
opening the desired storage from the main menu or storage dashboard, then selecting
Manage > Edit Storage Definition.

Edit Storage Properties
The
Storage Properties panel can be edited using the same interface as
when it was originally created.
Edit Storage Hierarchy
Open the storage definition for editing, then click
Storage Hierarchy. The interface for editing the hierarchy is the same as when you created it. Drag and drop units to where they should be. Use
to expand sections in the hierarchy.
When storage is empty, i.e. before any Samples have been stored in it, you have more flexibility in changing the layout and storage location contents.
Once some samples are stored, you will see a
icon marking storage units that cannot be deleted. You can still add additional storage units to "locked" non-terminal storage. For example, you can add more boxes to a rack that shows as "locked" because it already contains boxes containing samples, but you cannot delete the rack entirely.
Add New Storage Units
Drag and drop new storage units to the positions in the hierarchy where you want them. Adding additional storage will change the capacity and usage percentages for the storage.
Adjust Existing Storage Units
Edit the
Name given to storage units to help your users identify the specific locations and containers they need. You can also add a descriptive
Label for each unit. Both the name and label of the box are indexed making it easier to
find a desired storage unit later.
Drag existing storage units to different parts of the hierarchy to move them within the current storage system. You can rearrange storage units even if they already contain stored samples.
Changing the position or name of a terminal storage unit will change the current information shown for all stored samples, but does
not register as a timeline event for samples provided it stays in the same storage system.
Learn about moving a storage unit to a different storage system, which
will be tracked as a timeline event for any samples it contains, in this topic:
Move Stored Samples.
Remove Storage Unit
When removing a storage unit from a storage system, first check to ensure that the physical samples stored there have been moved to new locations in the system, otherwise you will lose the tracking data associated with the first location.
Learn more about moving samples in this topic:
Move Stored Samples.
Change Storage Unit Type
If you find you need to change the type of a storage unit, either because the wrong initial type was created or because your labelling system has been changed, first create the new/corrected unit "parallel" to the one you are replacing.
- If you are changing a non-terminal storage unit (such as replacing a shelf with a rack) you can drag the contents of the old unit into the new one.
- If you are changing a terminal storage unit type, such as a box, you must specifically move the samples from the old to the new unit.
Once the "old" unit is empty, it can be
removed.
Related Topics