This topic describes a LabKey Server workflow for managing
samples and sequencing results generated from Illumina instruments, such as the MiSeq Benchtop Sequencer. This workflow lets you:
- organize sample information, such as sample ids, types, MID tags, experiment-specific data, etc.
- prepare an Illumina sample sheet to be passed to the MiSeq instrument
- automatically associate the Illumina-generated sequence results with the original sample information
- browse and export the sequence files
Set Up a Dashboard
First we will set up a Genotyping dashboard, and import some sample data.
- Download genoCleanSamples.folder.zip -- This is a folder archive that contains the Illumina sample data and other files. Don't unzip the file.
- Import the folder archive, as shown below. This will add resources to your existing dashboard
- Navigate to the Home project, or any project convenient for you.
- Create sub-folder in the project: Select Admin > Folder > Management and click Create Subfolder. Create a folder of type Genotyping.
- When the folder is complete, overwrite it with the folder archive you just downloaded: Select Admin > Folder > Management.
- Click the Import tab.
- Under Import Folder From Local Source, confirm Local zip archive is selected and click Choose File.
- Select the file genoCleanSamples.folder.zip.
- Click the button Import Folder.
- The folder archive will be unzipped and its resources added to the folder your just created. Notice also that the folder imports, but with an error -- an error which we will correct in the next step.
- Click the Genotyping Dashboard tab to return to the main dashboard.
Configure Sample Data
Next we will we will tell the dashboard where to find the sequence data, haplotype definitions, and run data.
- Under =Settings, click Admin.
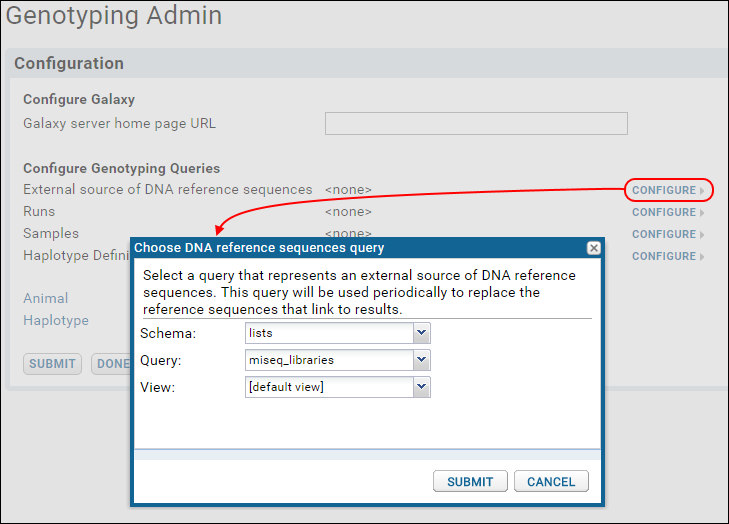
- Under Configure Genotyping Queries, next to External source of DNA reference sequences, click Configure.
- In the popup dialog:
- Click the Schema dropdown and select lists.
- Click the Query dropdown and select miseq_libraries.
- Leave the View dropdown at it's default value [default view].
- Click Submit.

- Under Configure Genotyping Queries, repeat for Runs, Samples, and Haplotype Definitions.
- For Runs assign the following values:
- Schema = lists
- Query = runs
- View = [default View]
- For Samples assign the following values:
- Schema = lists
- Query = samples
- View = [default View]
- For Haplotype Definitions assign the following values:
- Schema = lists
- Query = barcodes
- View = [default View]
- Click Submit.
- In the Reference Sequences panel, click Load Sequences.
Now we are ready to begin using the dashboard.
Prepare an Illumina Sample Sheet
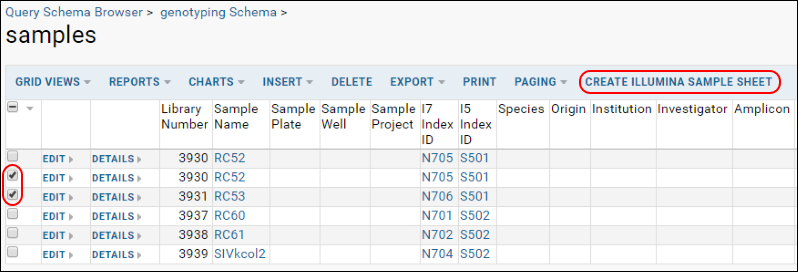
- Under Manage Sample Information, click Samples.
- Select the sample or samples you want to sequence.
- Click Create Illumina Sample Sheet.

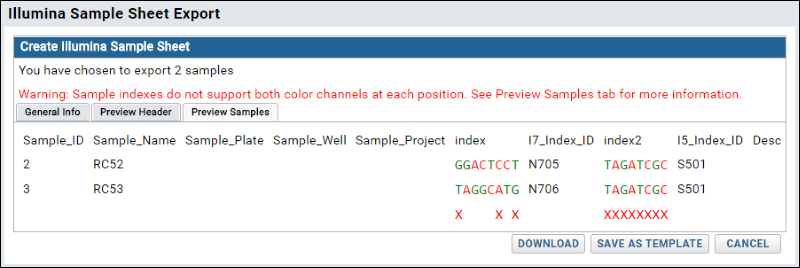
- Complete the sample sheet and click Download to download as a CSV file. This CSV sample sheet can be read directly by the Illumina instrument.
- Note the warning provided by the sample sheet validation checker.
- You may save your work as a template for future runs.

Run Samples
- To perform a run, first insert a record into the Runs list. (Go to Tasks > Import Run.)
- Prepare the samples to sequence on your instrument:
- Input (1) the samples and (2) the CSV sample sheet to the Illumina MiSeq instrument, which runs and generates data.
Import Results
- The generated data (FASTQ files) and the sample sheet are then re-imported:
- Go to the Files webpart.
- Select the CSV file.
- Click Import Data.
- Pick Import Illumina Reads.
- Choose which run you associate it with.
- When you hit Import, a pipeline job runs that will import your raw reads. The system assumes that the input FASTQ file have already been binned into separate files per sample (the Illumina instrument handles parsing the barcodes), which will be renamed based on the sample name. Basic metrics are stored for each FASTQ file, like the total read number.
View and Download Files
- For each run, you can view the set of files created, plus sample attributes.
- You can download the files individually, or select multiple files and choose to download a batch of them.
Resources