A complex business workflow process can be encapsulated within a straightforward user interface, simplifying operations. Our tutorial sample module includes a very simple interface for initiating the underlying process called "Multiple Assay Workflow". In this step we see how this workflow would be started, and explore how users can manage many workflows within the same container.
Run A Sample Workflow Process
- In a new browser window, open http://localhost:8080/labkey and navigate to the Workflow Tutorial container you created earlier.
- Select Admin > Go To Module > LabWork. This opens the module "labWork" you installed and enabled in your project.
- You will see the very basic UI which would kick off our sample process:

- Select one or two assays and click Make Request.
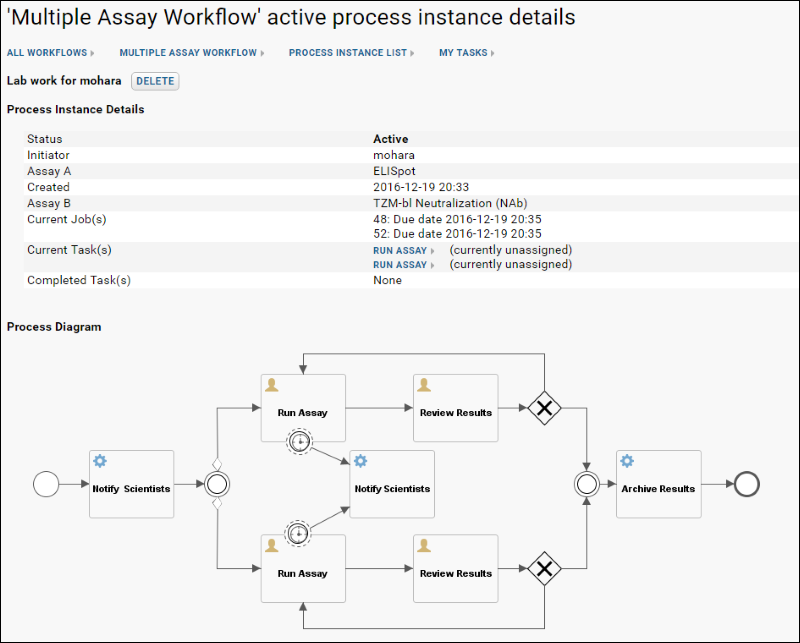
You will see the details of the new active process instance, including current jobs and tasks, assignees (if any) and the process diagram itself. The process of how that relatively minimal input is expanded into the assignments and tasks shown is covered by the workflow process definition which we will explore in the next step.

- Click links to see:
- All Workflows: a listing of all workflows currently deployed in this container.
- Multiple Assay Workflow: a listing of current instances of this workflow.
- Process Instance List: a listing of all process instances. This top level assay request has spawned additional processes (to actually run the assays requested).
- My Tasks: a listing of tasks assigned to the current user.
Workflow List Webpart
To make the workflow easier to initiate from the home project:
- Return to the Start Page tab and add a new Workflow List web part to your workflow tutorial folder. It gives you ready access to all workflows deployed in the container.

Next we will explore the process definition that underlies this workflow and diagram.