An
Advanced (External) Specimen Repository can be configured to support specimen request and tracking. The configuration of the repository is done by an adminstrator as in the
Step 1: Repository Setup (Admin). The tracking system can also be managed by an administrator, or these steps can be done by a user granted
Specimen Coordinator permissions.
Set Up Specimen Request Tracking
From the study home page, open the
Specimen Data tab and click
Settings. This tutorial will walk through some of the
Specimen Request Settings section. For more information about all of the options available, see
Specimen Coordinator Guide.

- Statuses: Define the different stages of the request approval process.
- Actors: Define people or groups who might be involved in a specimen request.
- Request Requirements: Define default requirements for new requests.
- Request Form: Customize the information collected from users when they generate a new specimen request.
- Notifications: Configure emails and notifications sent to users during the specimen request workflow.
- Requestability Rules: Manage the rules used to determine specimen availability for request.
Statuses
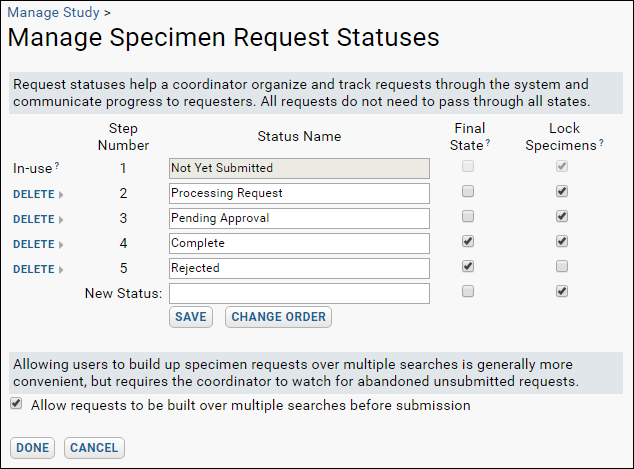
A specimen request goes through a number of states from start to finish. Request statuses help a specimen coordinator organize and track requests through the system and communicate progress to requesters. States are numbered sequentially, but not all requests need to pass through all states.
- Click the Specimen Data tab.
- Click Settings in the Specimen Tools web part.
- Click Manage Request Statuses under Specimen Request Settings.
- If they are not already defined, add the "Processing Request", "Pending Approval", "Complete", and "Rejected" statuses as show below (including the checkmark columns to the right).
- Click Save after each addition.
- When finished, click Done.

Notice the option to
Allow requests to be built over multiple searches before submission. This is a convenience for requesters, but requires the coordinator to watch for abandoned unsubmitted requests that may have locked specimens needed by others.
Actors
Each person or group involved in processing a specimen request should have an
Actor defined to represent them in the specimen repository tracking system. Examples include:
- Specimen requesters, such as lab technicians or principal investigators
- Reviewers of requests, such as oversight boards or leadership groups
- Those responsible for storing and shipping specimens, such as repository owners
Actors can be of two types:
- One Per Study: There is one group of people representing this actor in the study, specified by a single list of email addresses.
- Multiple Per Study (Location Affiliated): There may be multiple groups representing this actor at multiple sites. Each site/actor combination has a separate list of member email addresses.
For this tutorial, it is helpful to define a few fictional "users" to demonstrate assignments. An administrator can add new site users via
Admin > Site > Site Users > Add Users. This tutorial uses:
- slg_member@fakemail.com
- highpoint_board1@fakemail.com
- highpoint_board2@fakemail.com
Return to the specimen tutorial folder, and the following steps can be completed by a specimen coordinator.
- Click the Specimen Data tab and click Settings.
- Click Manage Actors and Groups.
- Fill out the form as show below. Click Save after each addition.

- Click Update Members on the Scientific Leadership Group row and add a fictional user email such as "slg_member@fakemail.com".
- Uncheck the Send notification emails to all users box for this tutorial.
- Click Update Members.
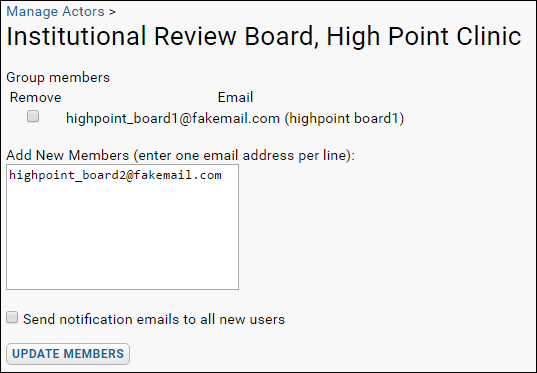
- Click Update Members on the Institutional Review Board row.
- Select a Site for this new (fictional) member (here "High Point Clinic"), then enter the fictional user "highpoint_board1@fakemail.com".
- Uncheck the Send notification emails to all users box.
- Click Update Members.
- By clicking Update Members again for any actor or actor/site combination, you can review the current list, remove, or add new members.

Request Requirements, Notifications and Rules.
The coordinator can also configure the following. For this tutorial, all the defaults are sufficient, but for more information, see
Specimen Coordinator Guide.
- Default requirements for new specimen requests
- Customize the request form itself to gather required information from requesters
- Define the email notification process and content
- Set requestability rules for specimens
Next Steps
Now your basic repository is ready for users to make some sample requests. You can continue to the next tutorial step as an Admin, Specimen Coordinator, or impersonate the role of
Specimen Requester (remember to first impersonate the Reader role). After some requests are made, you can return to the role of coordinator to track and approve them.