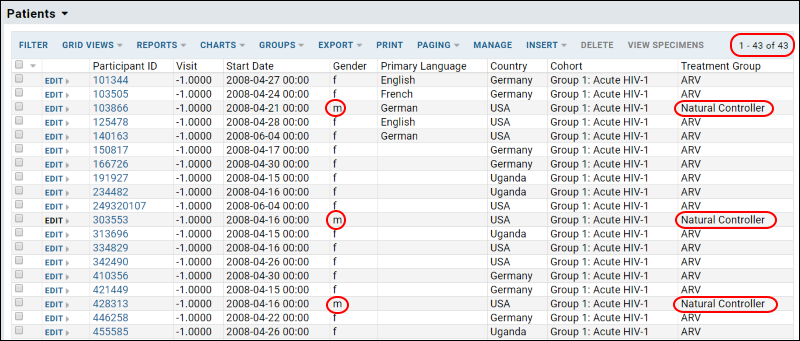
Suppose you wanted to expand the
Patients dataset to also include male participants who are "Natural Controllers" of HIV.
To do this, we add a
SQL query that returns a selection of records from the Demographics table, in particular all Male participants who are Natural Controllers.
And we'll create a new ETL process from scratch, drawing on the new SQL query.
Create a New Source Query
- Locate the source code for the ETL module. Depending on where you deployed it, go to either LABKEY_HOME/externalModules/etlmodule or build/deploy/modules/etlmodule.
- Go to the directory etlmodule/queries/study.
- In that directory, create a file named "MaleNC.sql".
- Open the file in a text editor and copy and paste the following code into the file:
SELECT Demographics.ParticipantId,
Demographics.StartDate,
Demographics.Gender,
Demographics.PrimaryLanguage,
Demographics.Country,
Demographics.Cohort,
Demographics.TreatmentGroup
FROM Demographics
WHERE Demographics.Gender = 'm' AND Demographics.TreatmentGroup = 'Natural Controller'
- Save the file.
- Restart the server.
Create a New ETL Process
ETL processes are defined by XML configuration files that specify the data source, the data target, and other properties. Here we create a new configuration that draws from the query we just created above.
- In the etlmodule/etls directory, create a new XML file called "MaleNC.xml".
- Copy the following into MaleNC.xml, and save.
<?xml version="1.0" encoding="UTF-8"?>
<etl xmlns="http://labkey.org/etl/xml">
    <name>Demographics >>> Patients (Males)</name>
    <description>Update data for study on male patients.</description>
    <transforms>
        <transform id="males">
            <source schemaName="study" queryName="MaleNC"/>
            <destination schemaName="study" queryName="Patients" targetOption="merge"/>
        </transform>
    </transforms>
    <schedule>
        <poll interval="1h"/>
    </schedule>
</etl>
- Notice that this configuration file has our query (MaleNC) as its source, and the Patients query as its target.
- Refresh the browser. Notice that the system will add your new module to the server. Click Next if necessary to complete the update.
- In the "ETL Workspace" folder, notice our new ETL process is now listed in the Data Transforms web part.
Run the ETL Process
- Click Run Now next to the new process name. You will need to sign in to see this button.
- Refresh in the pipeline window until the job completes, then click the ETLs tab.
- New records will have been copied to the Patients table, making a total of 43 records (42 if you skipped the step of changing the gender of a participant in the previous tutorial step).

